


When Andrew and I started looking for a home a few years ago, a game room and a place to hang out with friends was at the top of our “really want” list. Sure, it wasn’t a necessity, but if it was at all possible to have, we wanted it. And from the moment we bought our house, we started talking about what we wanted the space to be.
We went through a lot of different designs and ideas over the past 2 years, but made very little progress on the room. So when we saw the One Room Challenge was kicking off 6 weeks ago, we decided it was time to finally commit to starting (and finishing) our game room.
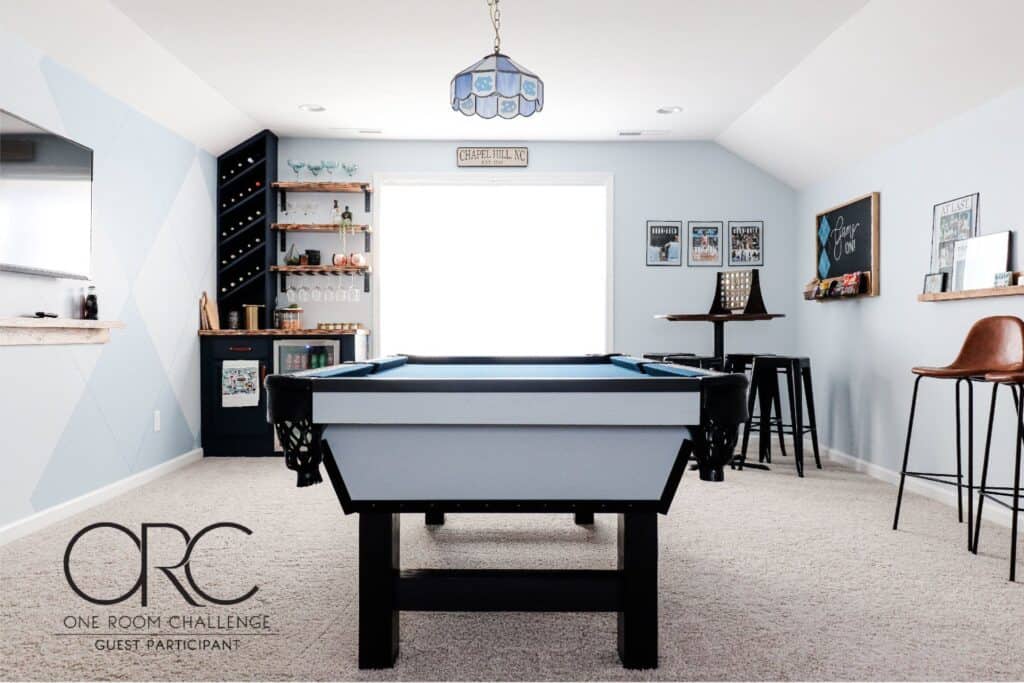
And friends, we did it! Our first One Room Challenge is officially in the books! Over the past six weeks, we’ve used a lot of power tools, spent hours painting and staining, and completely renovated our game room. Conveniently enough, the reveal came just in time for basketball season.
P.S. All sources are listed at the end of the post.
This post contains affiliate links for your convenience (which means if you make a purchase after clicking a link, I earn a teeny-tiny commission, but it won’t cost you a penny more)! Click here to read our full disclosure.
Before we dive into the reveal pictures (which I know is the real reason you’re reading this), let’s take a walk down memory lane. We started with a blank slate for this space which meant we didn’t have to knock down any walls or do anything crazy before we actually got started. Here are the before pictures:


Our renovation started out with the pool table transformation. The goal was to make it look like a completely new table–which I think we accomplished! I got a handful of messages of people asking if we bought a new pool table, so I’d say that’s a success!


Our next step was to make the room feel comfortable and fun. Since this is a game room, we wanted there to be a lot of options. From board games, to checkers, to darts and hangman, we wanted an endless supply of things to do.
But while everyone is doing these activities, they need a place to put their drinks and sit down, so we built a few small end tables, a ledge for drinks, and a high-top table.


Next up was the part I was most excited about–the bar! Let me finish, I was excited about the design, not necessarily about the alcohol. Andrew and I actually aren’t big drinkers, but every game room needs a bar! Plus, Andrew is a master mixologist and loves making fun fancy cocktails.


Alright, if you’ve been following me on Instagram the past few weeks, you know that we’ve been working on a “secret” project. A handful of people guessed what it was, but now it’s time to let everyone in on the secret. We built a ping pong tabletop!
Now here’s the thing. It’s not a regulation ping pong table. It’s about a foot narrower than a typical table, but making it a foot narrower made it lighter and literally half the cost of the full table. We wanted something simple and we love it! The leather net was my first time giving sewing a shot and I have to say, I’m hooked!
But the ping pong table isn’t just a ping pong table. It’s also two pieces of art! We created a large frame on the wall that you see when you come up the stairs.
The back of each side of the ping pong table has a mural: MJ (because Carolina + basketball = GOAT) and an iconic “Greetings from Chapel Hill” mural. One side of the frame comes out so that you can slide the ping pong table/murals in and out. PRACTICAL, PRETTY STORAGE. There’s nothing better than that!


So what do you think?? Did you enjoy following the transformation over the past few weeks? Are you inspired to conquer a room in your house?
And if you love a good before and after, don’t forget to check out the reveals of all of the other One Room Challenge participants!
DIYs + Sources
As you know, we DIYed the majority of the game room. BUT that doesn’t mean you can’t get the look yourself without DIYing. Below are all the sources for the game room and look-alikes for the items we DIYed. If something is missing that you want, send me a message on Instagram and I’ll be sure to get it updated!
You can find all of the DIY tutorials by clicking on the links below:
- Built-In Bar
- Wood Slice Side Table
- High Top Table
- Checkerboard Table Top
- Wine Glass Rack
- Slanted Wine Bottle Rack
- Pool Table Transformation
- Leather Handles
- Faux Brick Wall
- Torched Countertop
- Pool Rack (coming soon)
- Ping Pong Table Top
- Ping Pong Storage (coming soon)
- Ping Pong Net


")


Hello, I absolutely love this transformation! I especially like the bar area. Do you have a post with more detailed instructions about how you attached all of the pieces? I have read the blogs on how you did each individual piece, but I’m new at this and like to have as much information as possible.
Thank you in advance!
Hi Janeth! Thanks so much! Unfortunately, we don’t have any more details about the bar area. We were just making it up as we went along, so we didn’t think to document it all.
What size of boards did you use for the shelves? What were the final measurements? Awesome transformation BTW!
Thanks Vanessa! We used 2x10s and cut them down to a little under 9″ wide and 30″ long.
How big was the room ? Looks great by the way !
Hi Xio! I can’t remember the exact dimensions. I want to say it was about 16×20? Maybe 15×18?
This looks amazing!! We are in the process of building a room above our garage, which will be used as a game room. Love the your design. My question was about room dimensions as well. It is hard to gauge just how much can fit into a room, especially with a pool table involved. Love the layout and the stylish pieces you put together!!
Hi! just found your post! Your game room is great! I know you said above that the bar cabinet area was made up as you went along but I was curious if you had any tips on the frame around the fridge? I see there is a vent on the side and an electrical outlet but I’m hoping to build something similar in our bonus room and any tips would be great!
Thanks!!
Hi Morgan! We first framed it out with 2x4s, making sure to leave plenty of room in the back of the fridge to prevent it from overheating since it’s not technically one that’s supposed to be built-in. We added a vent on the side to help with the overheating/air circulation as well. So far, we’ve had no issues! We also added the outlet to the side for convenience. It’s really just out an extension cord, so it’s plugged in behind the bar. Once we had everything cut for the outlet and vent, we just nailed plywood and 1x4s (or maybe 1x3s…) to the 2x4s to frame it out and make it look complete. A lot of people remove the baseboards behind the bar area, but we chose to leave them and to use a jigsaw around the baseboards instead. Hope that helps a bit!
What is the bar cabinet itself? A dresser? Buffet?
It’s a pre-made cabinet from Lowe’s that we framed out and built into the corner!