


This post is sponsored by Kreg Tool. It also contains affiliate links for your convenience (which means if you make a purchase after clicking a link, I earn a teeny-tiny commission, but it won’t cost you a penny more)! Click here to read our full disclosure.
When we’re not building something for our house, there’s nothing we love more than building something for our family. When Andrew’s sister moved into her first house, we knew we had to build her something. Her request? A DIY bar cabinet.
What a fun project! There were a few things we wanted to make sure that this DIY bar cabinet had:
- plenty of storage
- an open area for storing wine bottles
- a place to store
- plenty of space to craft fun cocktails

And on top of all of that, we wanted it to look beautiful of course. After a lot of sketches and design ideas, we nailed down the design for a hutch bar cabinet. Ready to build your own?
Let’s start DIYing!
Tools
- Circular Saw
- Accu-Cut Circular Saw Guide
- Rip Cut Circular Saw Guide
- Miter Saw
- Drill
- Nail Gun
- Kreg 720
- Kreg Drawer Slide Jig
- Kreg Shelf Pin Jig
- Kreg Multi-Mark Tool
- Kreg Cabinet Hardware Jig
- Optional: Table Saw
New to DIY? Check out our post on beginner woodworking tools to determine which tools to get!
What You’ll Need
- 2 – 3/4″ 4×8 plywood sheet (we used primed)
- 1- 1/2″ 4×8 plywood sheet (we used maple)
- 1 – 1/4″ 4×8 beadboard sheet
- 1- 1/4″ 2×4 plywood sheet (we used maple)
- Optional: 1 – 3/4″ 4×8 plywood sheet for the wine bottle rack (we used oak)
- 6 – 1x2x8 (we used primed pine)
- 2 – 1x3x8 (we used primed pine)
- 1- 1x6x6 (we used primed pine)
- 1 – 2.25″ Primed MDF Casing
- 1 – 3.25″ x 8 Primed MDF Baseboard
- 3 – 1/4x3x3 poplar board
- 3 – 3/8″ 3ft long square dowels
- Wood glue
- Sandpaper (180, and 220 grit)
- 1″ nails
- 1.25″ nails
- 1.25″ screws
- 1.25″ Kreg screws
- 1″ Kreg screws
- 3 drawer pulls + 2 cabinet door pulls
- 3 sets of 16″ drawer slides
- 2 sets of non-mortise hinges
- 2 magnetic door catches
- 8 adjustable shelf pins
- Paintable caulk (if painting)
- Wood filler or if painting, you can use spackle
- Paint and/or stain
Note: getting everything cut out of two sheets of 3/4″ plywood is tight. Make sure to lay everything out first. If you are planning to stain your project and care about the direction of the wood grain, you will likely need 3 sheets of plywood to get everything in the “right” direction.
Prefer printable plans? Grab your bar hutch cabinet plans HERE.
Approximate overall dimensions: 50″ wide x 19.5″ deep x 74″ tall

How to build a DIY bar cabinet
New to DIY? We put together a free training to help you get started! Watch it HERE.

STEP 1: CUT WHAT YOU NEED FOR THE MAIN STRUCTURE
For the main structure you’ll need to cut the sides, bottom, back, top, bar counter, middle dividers , and bottom supports.
To cut these boards down, we used both our Kreg Accu-Cut and Rip Cut Circular Saw Guides. These help us to accurately cut down plywood without the hassle of maneuvering a huge sheet of plywood around our table saw.

STEP 2: DRILL POCKET HOLES
For this project, we’ll use the 3/4″ setting on our Kreg Jig. We have a Kreg 720 that makes drilling a lot of pocket holes a breeze–my favorite feature of it is the auto-adjust clamp!
Pocket holes are the foundation of most DIY furniture. Become a pocket hole pro in less than an hour in Pocket Holes: Explained.

You’ll need to drill the following pocket holes to assemble the main structure:
- 4 pocket holes on either short end of the bottom, bar counter, top, and middle divider boards
- 3 pocket holes along one long end of the bottom support boards
STEP 3: ASSEMBLE THE MAIN STRUCTURE
To assemble the main structure, we will attach everything using glue and 1.25″ Kreg screws.
Start by placing the first side down on the table and attach the bottom to the side. The bottom will be placed 3.25″ from the bottom. We like the take the bottom support and place it flush with the bottom of the side and then butt the bottom up next to that. It helps us get the right spacing with minimal measuring.

Next, place a center divider on top of the bottom to act as a spacer for where the middle piece should go. Butt the middle piece up against the divider and screw it in, making sure the pocket holes are facing down towards the bottom.

Then place the top flush with the top of the side.

Before we attach the second side, we’ll add in the dividers. The dividers will be placed so that we have the appearance of 3 – 14.5″ compartments after we add the trim.
Measure and mark 16″ from either side of both the bottom and the middle and attach your dividers.

As you’re placing everything, it should all be flush with the front and indented 1/4″ along the back.
Now attach the second side.

Finally, attach the bottom supports. No need to perfectly measure these. They should be close to equally spaced along the bottom, but it does not need to be exact.

STEP 4: FRAME IT OUT
Start by attaching the top trim and bottom trim pieces that you cut out of plywood. Don’t worry, these aren’t actually the final trim–just what the final detail trim will attach to.
Attach the bottom piece flush with the front of the bottom of the cabinet using glue and 1.25″ nails. Then attach the top piece flush with the top of the cabinet.
Now we can attach the 1×2 boards that will be used to frame out the rest of the front. These will almost all be attached using glue and 1.25″ nails. I’ll let you know when there’s an exception on how to attach it.
We started with the long vertical boards, making sure they were flush with the outside of the cabinet.

Then we attached the horizontal boards. The middle one will be flush with the top of the bar counter and the bottom one will sit right on top of the bottom trim piece.
The top horizontal board will be attached using 2 pocket holes on either end. These pocket holes will be drilled using the 3/4″ setting and then secured using glue and 1.25″ Kreg screws. The top of this board should be flush with the bottom of the top trim board.
The final horizontal frame will be placed 5.75″ underneath the bottom of the one that is flush with the top of the bar counter. This frame will separate the drawers from the doors. It will also be attached using 2 pocket holes on either end. We like to cut a spacer board to make sure we get the spacing right. It needs to be big enough for the drawer fronts to fit, but not too big where there are huge gaps on the sides.

After installing these, we’ll attach both the medium and short vertical frame boards, making sure they are flush with the inside of the middle cabinet. These 1x2s should all extend over the side cabinet boxes by 3/4″.
STEP 5: ADD THE TRIM
Now that it’s all framed out and starting to look like a real piece of furniture, it’s time to add some trim to the top and bottom to elevate it even further. For the top trim we actually used some door frame trim instead of traditional crown moulding. You can do either–it’s just a matter of what style you want.
To attach the trim to both the top and the bottom, we used glue and 1″ nails. We mitered the corners and trimmed out the sides and the front. There is no trim on the back of the bar cabinet.
STEP 6: ADD SHELF PIN HOLES
We like to make adjustable shelves when possible–it’s always nice to have the option to change the configuration to accommodate whatever you need to store! The shelves inside the side cabinets will both be adjustable.
We cut a spare board to 10″ and place it at the bottom of the cabinet box to act as a spacer. Then we used our Kreg Shelf Pin Jig to drill the holes for the shelf pins.

STEP 7: MAKE SHELVES
For this project, there are two different shelf sizes that we’re making: two shelves for behind the cabinet doors and one long shelf for the top section of the hutch. They will be made using the same technique.
To make the shelves, attach a 1×2 to the front of your plywood panel using glue and 1.25″ nails.

For the cabinet shelves, the 1×2 will be flush with the top of the plywood. For the top shelf, the 1×2 will be flush with the bottom of the plywood.
Once the shelves are made, we’ll install the shelf supports for the top shelf. The shelf supports should be indented 1/4″ from the back of the sides and the bottom of the support should be placed 21″ from the top of the bar counter. Install the shelf supports using glue and 1.25″ nails.
STEP 8: MAKE DRAWER BOXES
For these drawer boxes, we used 1″ Kreg screws and 1/2″ plywood. Check out our full tutorial on how to make drawer boxes.
STEP 9: MAKE DOORS
For the doors, we followed this technique to make the shaker style doors on the table saw.
If you don’t have a table saw or don’t want to use one, you can also make the doors using pocket holes.
Since these are inset doors, it’s super important to measure your openings and determine your exact door sizes. They will likely differ slightly from ours.

STEP 10: PREP FOR PAINTING OR STAINING
Fill gaps with wood filler (or spackle if painting). Once it’s dry, sand everything with 220 grit sandpaper.
If painting, caulk any seams before painting for a more seamless finish.
STEP 11: PAINT OR STAIN
For this project, we used Sherwin Williams Evergreen Fog in their Emerald Urethane Trim Enamel line with a satin sheen.
For the wine bottle storage, we stained it with Minwax Rustic Beige and sealed with Minwax Soft-Touch Finishing Wax. We didn’t stain the wine bottle storage until later in the project though.
STEP 12: MAKE THE WINE GLASS HOLDER
Check out our tutorial on how to make the hanging wine glass holder. We placed the back of the wine glass holders flush with the back of the shelf. We placed the first holder approximately 2.5″ in from the side of the shelf.

STEP 13: ADD HARDWARE TO DOORS AND DRAWERS
To install the drawer pulls and door knobs, we used our Kreg Cabinet Hardware Jig. Set the depth of the jig to be halfway down on your drawer (2.75″) and then set the jig to match the distance of your hardware. Mark the center of your drawers and line the mark up with the center lines of the jig. Drill on through and install your hardware.

For the door knobs, we centered them across the 1×3 at 1.25″, then we placed it 2.5″ from the top.
STEP 14: INSTALL DRAWERS
To install the drawers, we used our Kreg Drawer Slide Jig. Before we can install the two outside drawers, we need to attach a spare board to the inside of either side of the cabinet. The drawer slides will be attached to these drawer slide supports and will allow the drawer slides to function without hitting the face frame.
To attach them, we placed them just a hair above the horizontal face frame and screwed them in using two 1.25″ screws.

Once installed, you can clamp the Kreg Drawer Slide Jig to the face frame and then place the drawer slide on the jig. Check with your specific drawer slides for the specified setback, but ours required 3/16″. To account for the face frame/drawer front, we screwed our drawer slide to the cabinet by placing it 15/16″ from the front of the face frame

.
Once you’ve attached the drawer slide to the cabinet, unclamp the drawer slide jig and re-clamp it so that it’s extending out of the drawer. Extend your drawer slides and place your drawer box on the jig so that the front of the box is in line with the “1” line on the jig.
Line your drawer slides up so that they are set back from the front of the cabinet the distance required by your drawer slides (3/16″ for us) and then screw the drawer slides to the drawer.
STEP 15: INSTALL DOORS
To install the hinges to the doors, we placed the hinges 2.75″ from the top and bottom of the doors.
To install the doors, you can use whatever method works the best for you. For this cabinet, we used a new technique that worked out fine for us.
We placed the door inside of the opening and then placed playing cards on the top and bottom of the door until the spacing was even. Then we used tape to mark where the hinges were. We opened the door and lined the hinges up with the tape as we screwed them in place.
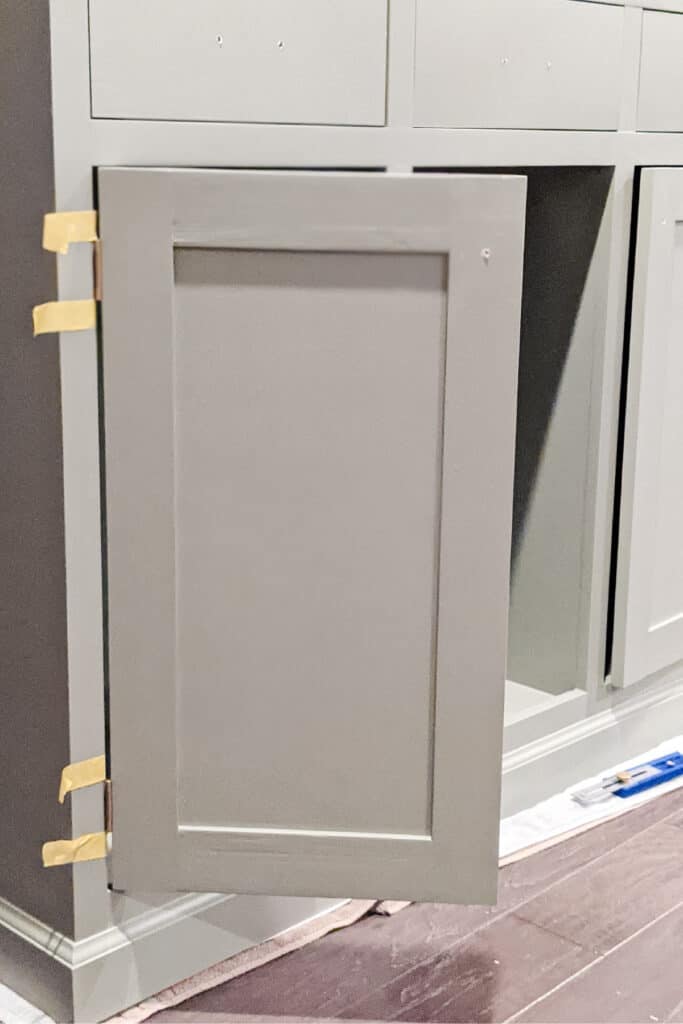
If you use this method, err on the side of placing the hinges slightly above where your tape was vs. below where your tape is.
OPTIONAL STEP 16: MAKE THE WINE BOTTLE STORAGE
You can definitely leave the middle section open and potentially add a shelf or two of open storage. Or you can build yourself a wine bottle storage rack.

STEP 17: INSTALL SHELVES AND BACK
To install the upper shelf, add some glue to the top of the shelf support and then place your shelf so that the back is lined up with the back of the support. Pop a few 1.25″ nails through the shelf and into the shelf support.

To install the back, slide it in until it’s flush with the back of the top, bottom, and middle of the structure. We popped some 1″ nails into the back to secure it in place, but you can also just use construction adhesive. If you do decide to nail, make sure to be very careful. Double-check your measurements and that your nail gun is straight. You don’t want the nails to pop through to the inside of the cabinet!
Note: we installed the back before painting the main structure and you can definitely do that too, but it would have been a lot easier to install the wine rack if we had left the back off. Rather than sliding through the front and accidentally chipping some of the frame off, we could have slid the wine rack in through the back.

Once you have the upper shelf and back installed, caulk all of the seams. Once the caulk is dry, add some touch-up paint to make it all look seamless.
To install the adjustable shelves, decide which height you want the shelves to be. Insert your shelf pins into the hole and then maneuver your shelf until it’s resting on the shelf pins.

There you have it! Now you have your very own DIY bar cabinet! Time to fill it up and invite your friends over to break it on in. Enjoy!


")


Truly a gorgeous project! The open wine shelving looks so chic!
Thanks Janet!!
This turned it absolutely beautiful Zoe!