


This post contains affiliate links for your convenience (which means if you make a purchase after clicking a link, I earn a teeny-tiny commission, but it won’t cost you a penny more)! Click here to read our full disclosure.
After two months of settling into our new house, the garage was finally organized enough to tackle some new projects. First up: the entryway. Being addicted to DIY furniture, we knew we would be building this entryway table ourselves.
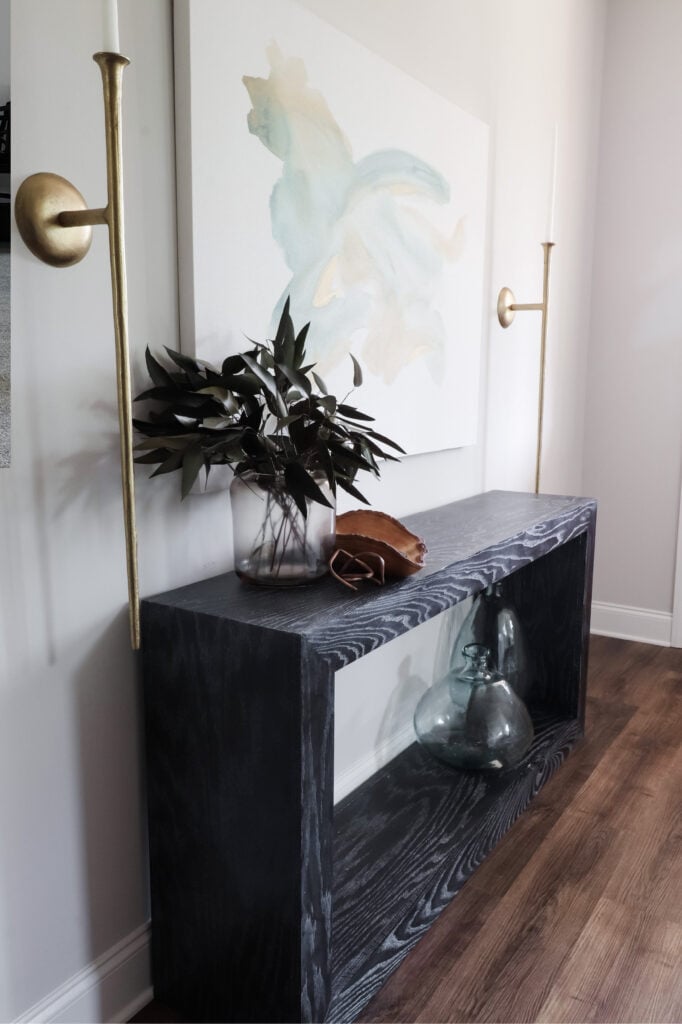
Our DIY entry table is a Folsom console table dupe. The 52” Folsom console from Pottery Barn runs about $799, but we were able to make ours using oak for about $200. If you wanted to use pine instead, you could build it for closer to $125. (Wood prices may vary depending on your location and what’s going on in the world. These prices reflect our area at the time of making this project).
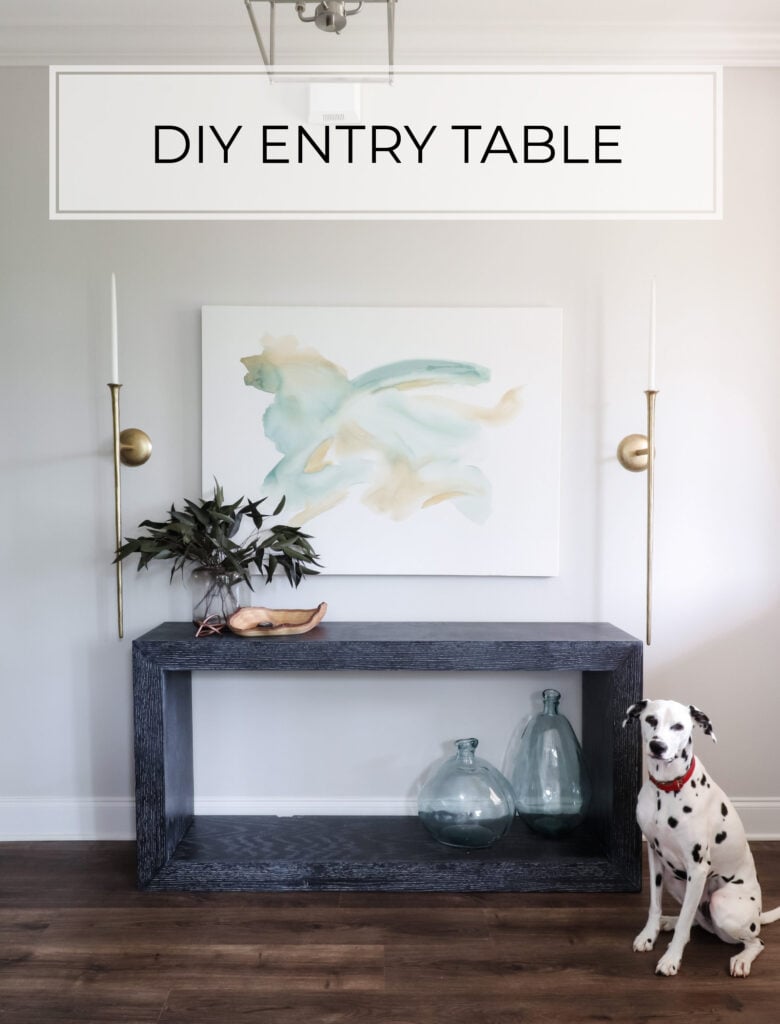
Aside from the money savings, we also got to change up a few things to make it even more custom. We loved the clean lines and waterfall edge of the Folsom table, but we wanted ours to be a bit more substantial.
We used 1x4s to bulk up the overall thickness of the design, increased the width to better fit our space, and then finished it with a unique finish I’d been dying to try for a couple of years now: black stain with white grain highlighting wax. The highlighting wax is the same stuff we used on the DIY shutter sideboard, but up against the dark black stain, it really popped!
Alright, enough chatting about this epic DIY entryway table, let’s start DIYing!

Recommended Tools:
- Circular Saw
- Miter Saw
- Drill
- Kreg Jig
- Nail Gun
New to DIY? Check out our post on beginner woodworking tools to determine which tools to get!
What You’ll Need:
- (1) ¾ x4x8 sheet of plywood (we used oak)
- (4) 1x4x8 boards (we used oak)
- (1) 2×2 furring strip
- 2” screws
- 1.25” Kreg screws
- 1.5” nails
- Wood filler
- Wood glue
- Painter’s tape
- Pre-stain
- Stain – we used Minwax Wood Finish Solid Color Stain in Carbonite
- Grain highlighting finishing wax
Cut List:
Do you prefer printable plans with 3D renderings and a visual cut list? Get the printable plans HERE.
It is always recommended to make your cuts as you go along the project and double-check your measurements along the way. The following cut list serves as a guide and your actual measurements may or may not be exactly the same.

Overall Dimensions: 60”W x 13.25”D x 30”H
| For What? | Board Size | Quantity | Size (inches)* |
| Top | ¾” plywood | 1 | 60 x 11.75 (both sides cut at 45-degree bevel to make a trapezoid) |
| Bottom | ¾” plywood | 1 | 58.5 x 11.75 |
| Sides | ¾” plywood | 2 | 30 x 11.75 (one side cut at 45-degree bevel) |
| Inside Side Pieces | ¾” plywood | 2 | 24 x 11.75 |
| Bottom Supports | ¾” plywood | 3 | 2.75 x 11.75 |
| Side Supports | ¾” plywood | 6 | 2 x 11.75 |
| Top Attachment | 2×2 | 2 | 11.75 |
| Top Support | 2×2 | 1 | 11.75 |
| Vertical Face Frames | 1×4 | 4 | 30 (both sides cut at 45-degree miter to create a trapezoid) |
| Horizontal Face Frames | 1×4 | 4 | 60 (both sides cut at 45-degree miter to create a trapezoid) |
*All measurements with angles reflect the longest side of the board.
For the angled cuts, we clamped a spare board to the board we were cutting to use as a straight edge guide. As you’re clamping, make sure your clamps are far enough away that you won’t hit them when cutting.

How to Build a Waterfall Console Table
New to DIY? Download our free 5 Steps to Getting Start with DIY guide!
STEP 1: DRILL POCKET HOLES
Using the ¾” setting, drill pocket holes in the following boards:
- (3) on each short end of the bottom
- (3) on one long end of the bottom supports
- (3) on one long end of each of the side supports
- (2) on each short end of the top support
And yes, we still recommend that you use the ¾” setting for the 2×2. This will prevent you from having to get different-sized screws.
Pocket holes are the foundation of most DIY furniture. Become a pocket hole pro in less than an hour in Pocket Holes: Explained.
STEP 2: ASSEMBLE BOTTOM
Use glue and 1.25” Kreg screws to assemble the bottom. Evenly space the three bottom support boards along the bottom piece. You can eyeball it – no need to measure it precisely.

STEP 3: ATTACH SIDES
Once you have the bottom support boards attached, you can attach the sides using glue and 1.25” Kreg screws. The top of the bottom should sit 3.5” up from the bottom of each side. The bottom of each side is the end that’s NOT cut at a 45-degree angle.
Rather than relying on measuring, I placed my bottom piece on the ground and set the side up against it. Then I marked when the bottom met the side to give me a line to match the bottom up with.

STEP 4: ATTACH TOP
To attach the top, align the angles of the top piece with the angles of the side pieces. We used painter’s tape to keep corners “clamped” as we attached the 2x2s.
Attach the 2×2 to the corner where the top and side meet using glue and 2” wood screws. We love the PowerPro brand because they don’t require pre-drilling. We used 3 screws for each direction for a total of 6 screws per 2×2.

You can also go ahead and attach the top support to the center of the top. It should be approximately 27” from each of the other 2x2s. To attach this, use glue and (3) 2” wood screws. Make sure the pocket holes are facing out so that you’ll be able to add screws to them later.

STEP 5: ADD INSIDE SIDE PIECES
Next, attach (3) side supports to each side using glue and 1.25” Kreg screws. You don’t have to measure them precisely. We placed one support on top of the bottom, one approximately 12” from the top of the bottom, and one approximately 22” from the top of the bottom.
Once the side supports are attached, line the inside side piece up with the bottom of the console and attach using glue and 1.5” nails. Nail into the side supports to attach.

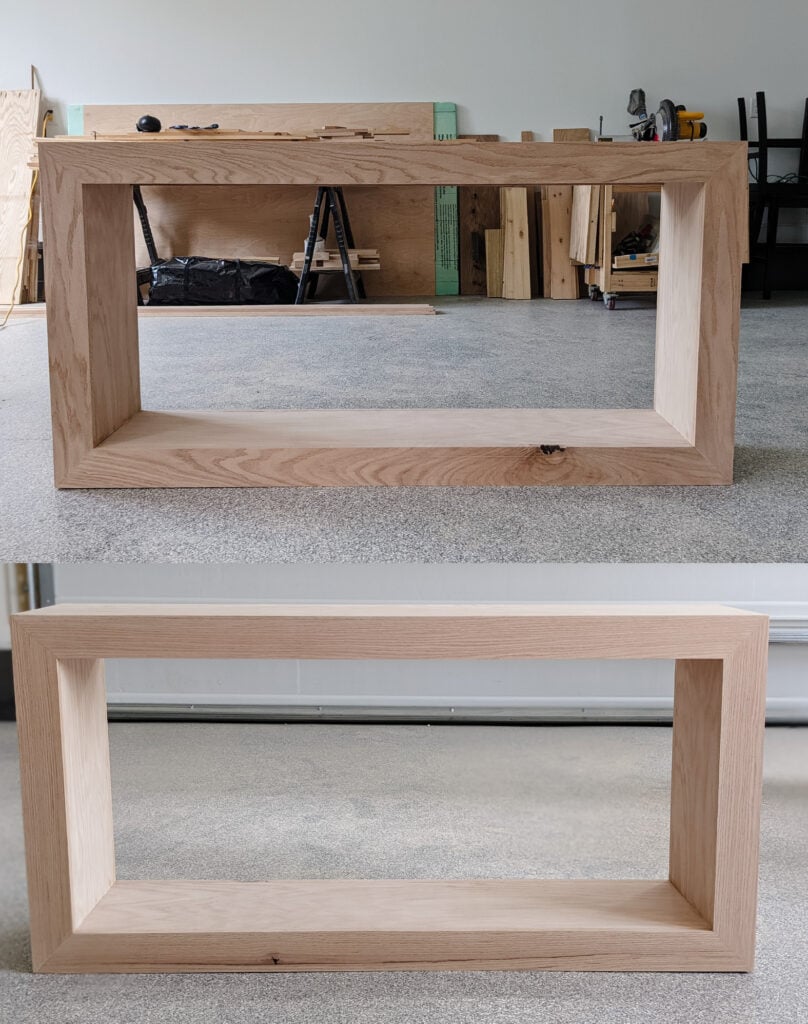
STEP 6: ATTACH FACE FRAMES
Now we have the main structure completed and it looks like a very uniquely designed console table…let’s turn it into a designer-looking piece!
Measure and cut each face frame piece one at a time. We recommend cutting each piece slightly larger than what you would expect it to be and then slowly trimming it down to avoid cutting it too short. We took each piece back to the miter saw for a small trim probably 2-3 times!
Start with the bottom piece, then the sides, and then the top. Attach using 1.5” nails. Then repeat with the other side.
If you have a lot of clamps, use them! They straighten out some of our warped pieces and keep things in place while nailing.

As you’re nailing things in, if everything isn’t lining up perfectly and your mitered corners have some gaps, don’t stress too much about it. Do the best you can and then we can fix and fine-tune some imperfections in the next step.
Side note: as we were picking out our wood, we couldn’t decide which grain pattern we liked better: a straight grain or a more patterned grain? We opted to buy two 1x4s with each grain pattern so that we could try both. This is also fun because it’s almost like two console tables in one. If I want to switch things up, I can just rotate the console around! Which grain pattern do you like better?
Once you have the top frames secured via nails, attach the top support board to the top 1×4 face frame boards using 1.25″ Kreg screws.
STEP 7: PREP FOR STAIN OR PAINT
The first step to prepping for stain or paint? Wood filler! Add wood filler to any of your nail holes and gaps in your mitered corners.
If you have some gaps between your top and side pieces, you can run a screwdriver along the edge to help bend the wood fibers and close the gap. Then add wood filler to fill any remaining gaps. Look at the difference some wood filler can make–and that’s before sanding!

After your wood filler has dried, sand your piece. I had a bit of an overhang on one of my top frame pieces (I prioritized a pretty mitered corner over keeping it flush with the top), so I first sanded that part down with 80 grit sandpaper.

Look at that before and after! I told you that you would be able to fix some imperfections after assembly.
For the rest of the entryway table, I sanded it quickly with 120, 180, and 220 grit sandpaper to get it nice and smooth.
STEP 8: FINISH
This is the step where you get to get creative. We’ve been wanting to try out this grain highlighting wax on top of a black stain for a while now but never found the right project for it. This entry table was the PERFECT project for it.
After sanding, I applied water-based pre-stain. After about 15 minutes, I lightly sanded the entire console table again with a 220-grit sanding block to make sure it was still super smooth.
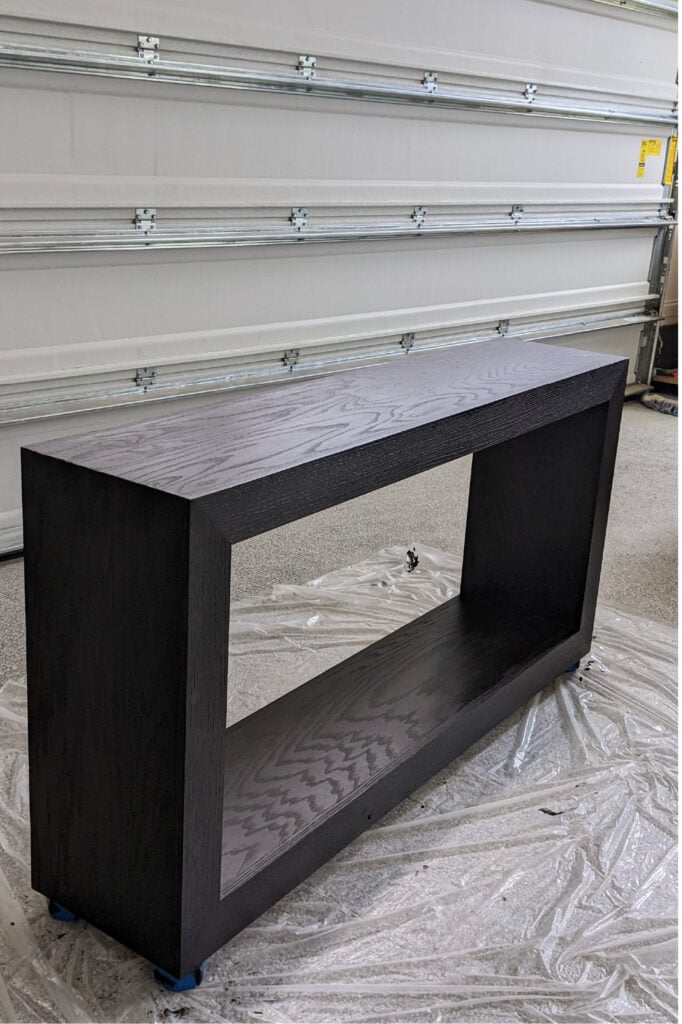
I then applied Minwax Wood Finish Solid Color Stain in Carbonite, which is one of the colors we used on this modern bookshelf we built a few years ago.
I let the stain dry for about 4 hours and then revisited the console table for the final touch. Honestly, after seeing how gorgeous it looked with just the black stain, I almost just sealed it with Polycrylic instead of using the wax. Which do you like better? Simple black or black with the white grain?
After testing out the grain highlighting wax on a hidden area on the entryway table, I decided to stick with my original plan – the wax was SO cool.
To apply the wax, you simply buff it on, wait about 3 minutes, and then wipe it off across the wood grain. One thing to note about the wax is that it only really works on oak. If you try it on pine, the grain doesn’t have grooves for the wax to get into, so it just wipes off. On oak though, you can see how neat of a finish it creates!
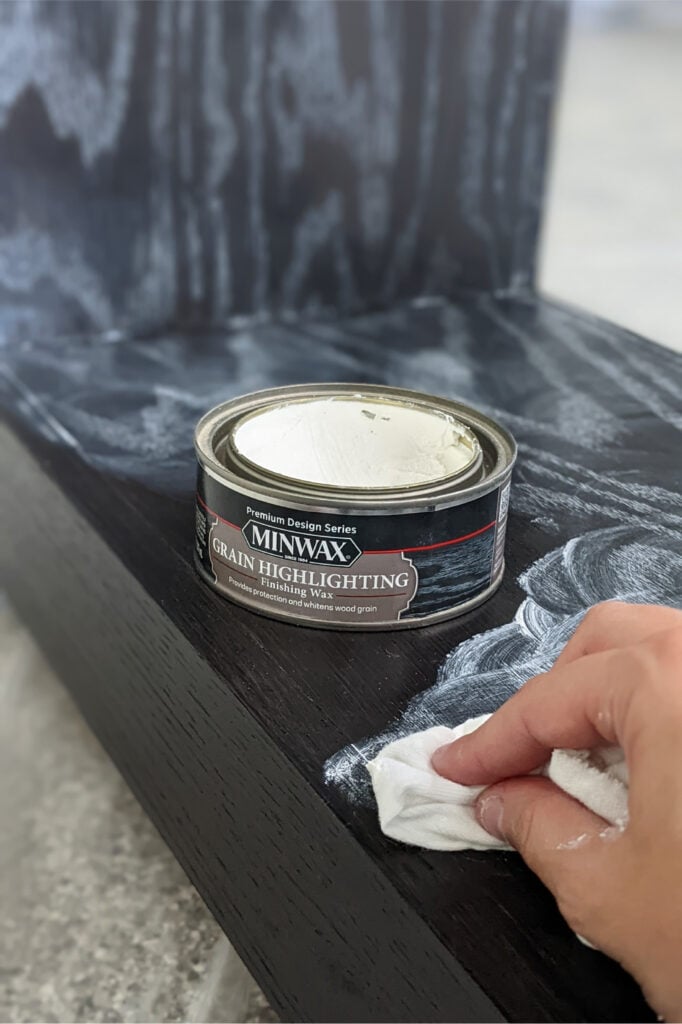
(P.S. Bad news. Minwax is discontinuing this finishing wax… as soon as I heard, I went out and bought all the remaining cans at my local store. I recommend you do the same – there are SO many amazing finishes you can create with this wax!)

There you have it! Now you know how to build your very own DIY entry table complete with a beautiful waterfall edge.
Click here to grab your printable plans
Looking for more console table ideas? Check out our roundup of the 18 BEST console table plans on the internet today!


")


