



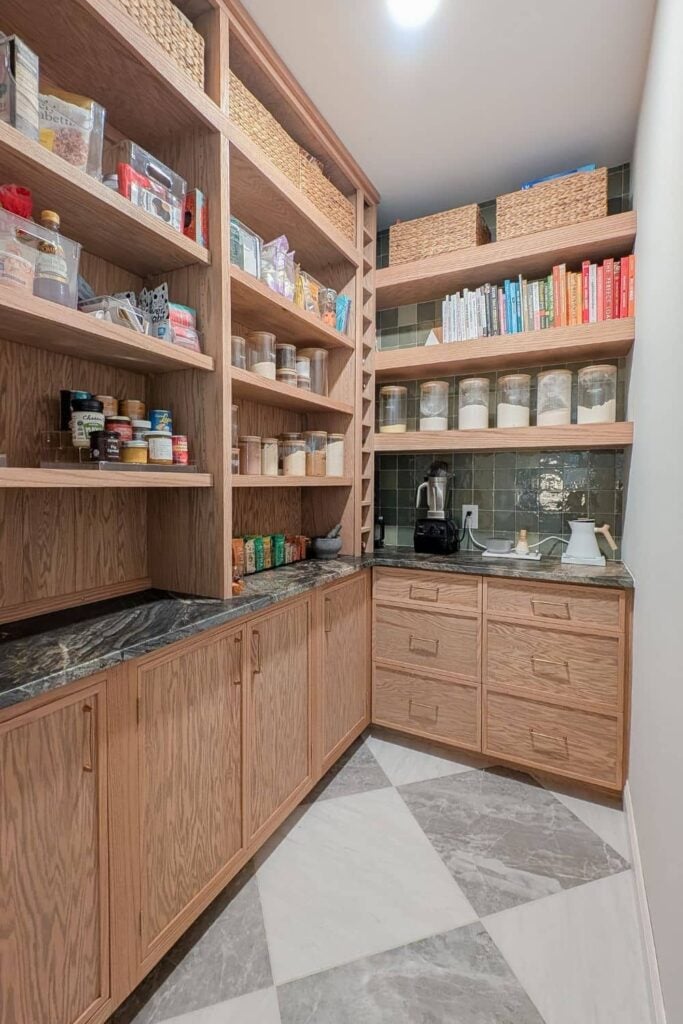
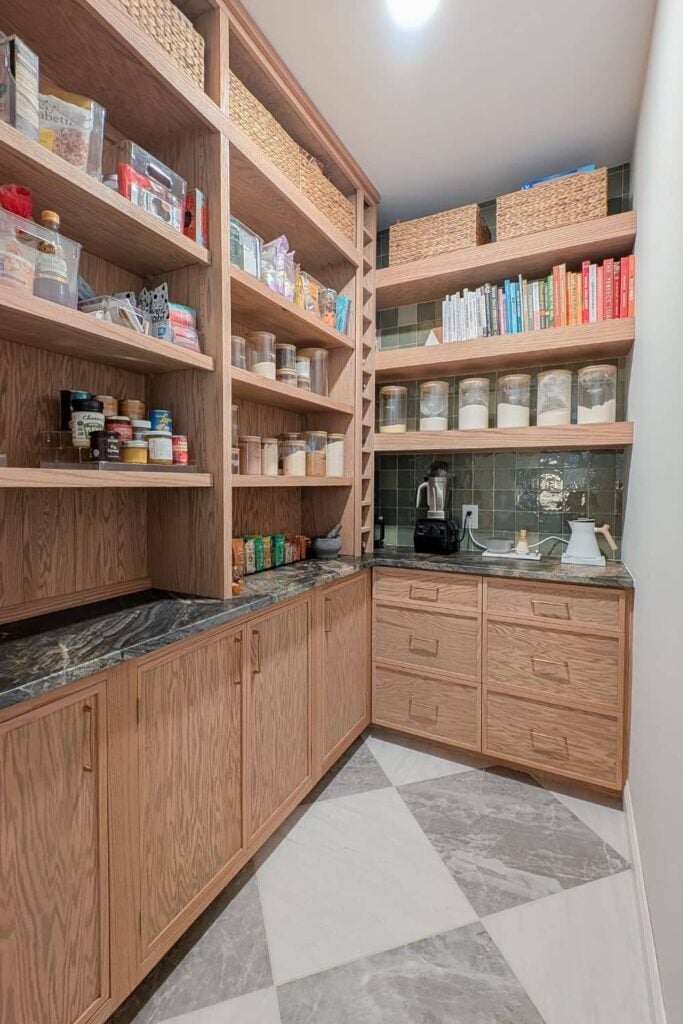
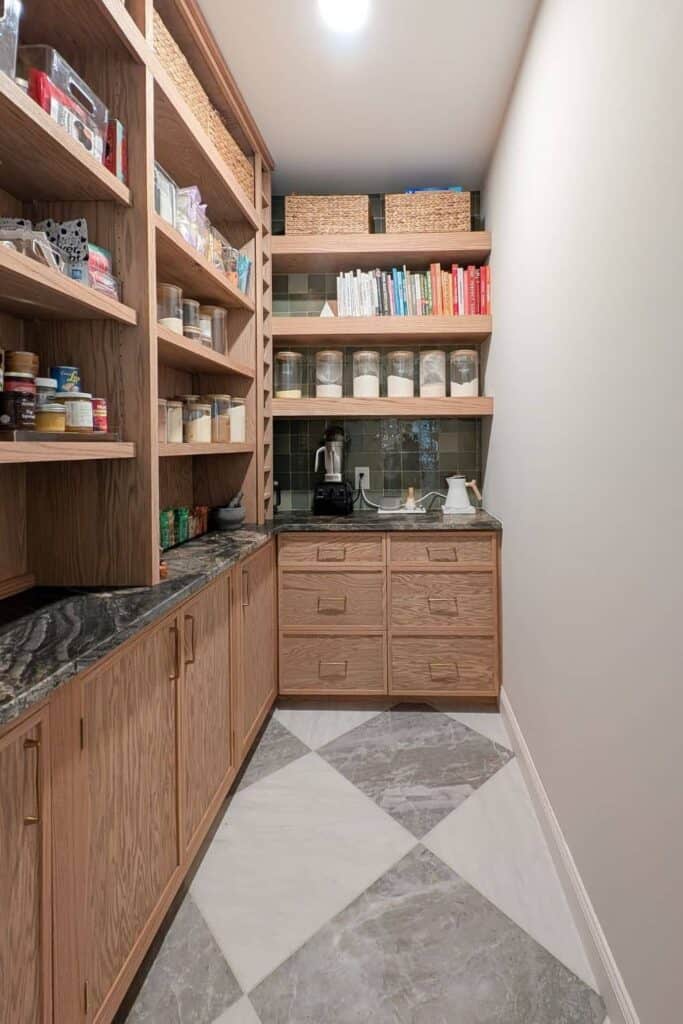
The pantry reveal is HERE!! We upgraded our above-average builder grade pantry into the designer pantry I always knew it could be.
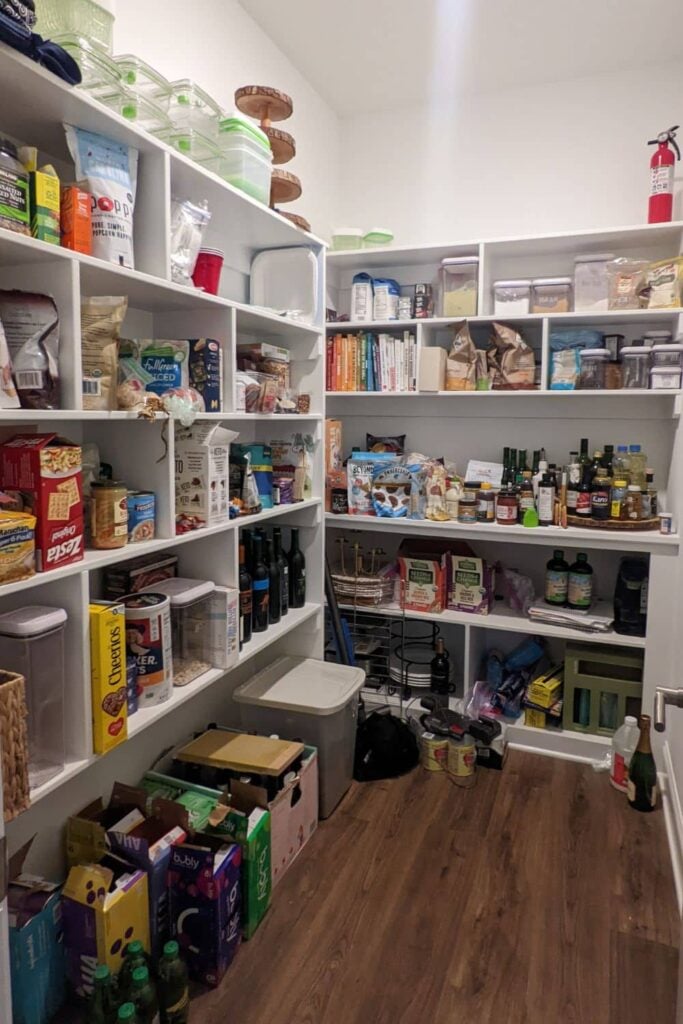
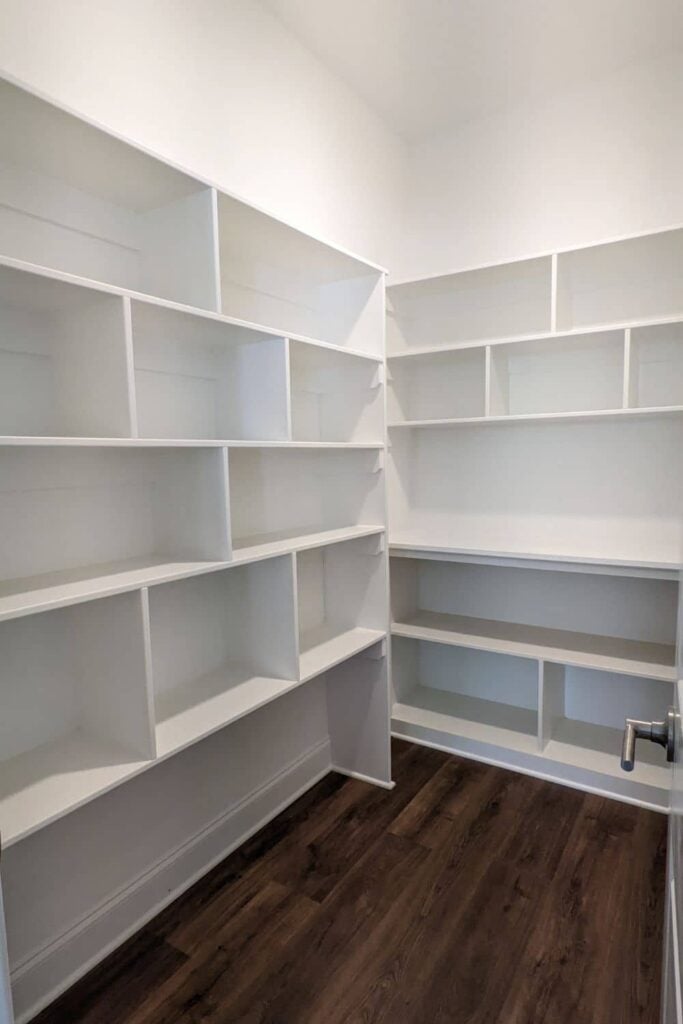
The before wasn’t bad (at least we didn’t have wire shelving).
But everything about it was just…not quite right. That’s the beauty (and the curse) of DIY: once you’ve created fully customized spaces designed to work exactly how you envision, you get used to things fitting just right.
And this pantry was not meeting that bar. The shelves were literally 1/16″ – 1/4″ too small to fit what I actually wanted to store on them, there was a ton of open storage on the bottom that always ended up messy, and there was so much wasted space between the ceiling and where the shelving stopped.
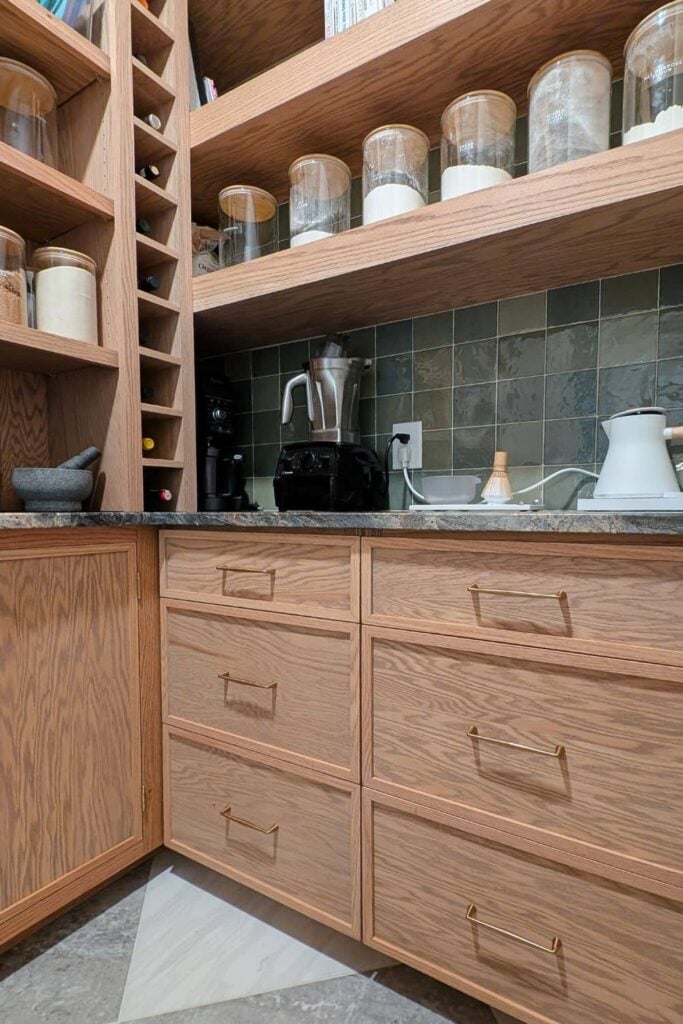
One specific example that especially bothered me: I couldn’t use the tamper on my blender because there wasn’t enough clearance between the countertop and the shelf above it. Silly, yes. Annoying? Yes. Luckily when you create something custom with DIY, you can design your space to solve for those daily annoyances.
If you’re just here for links or reveal photos, scroll on down to the bottom of the post and you’ll see a nice long list of all of the supplies and tools that we used on this project. If something is missing, leave a comment and we’ll get the post updated!
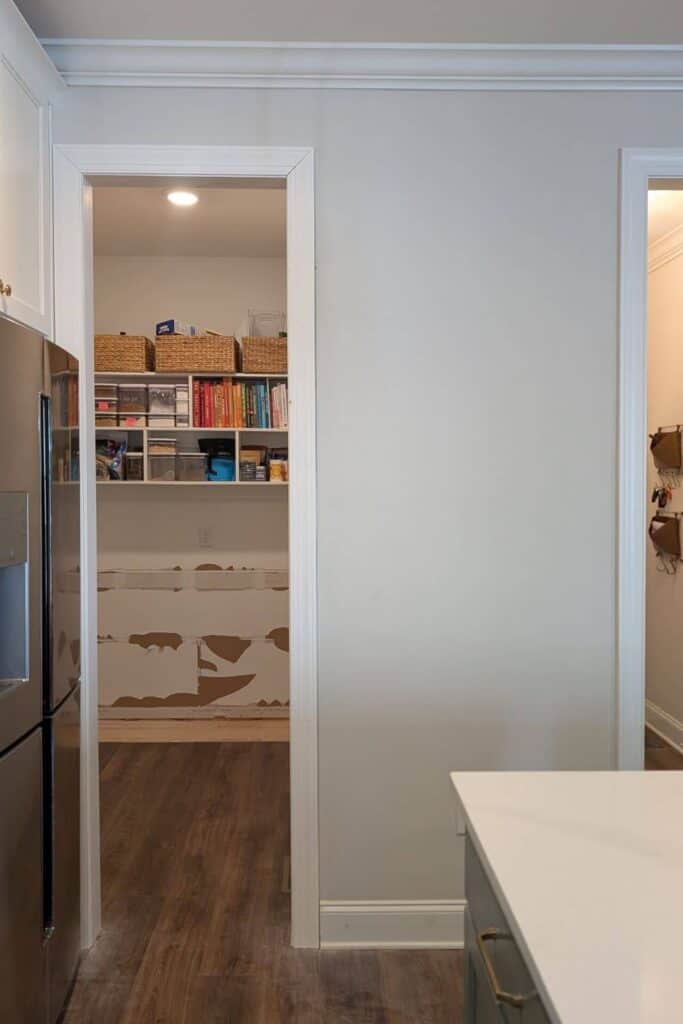
So let’s first start with some before photos of the space:
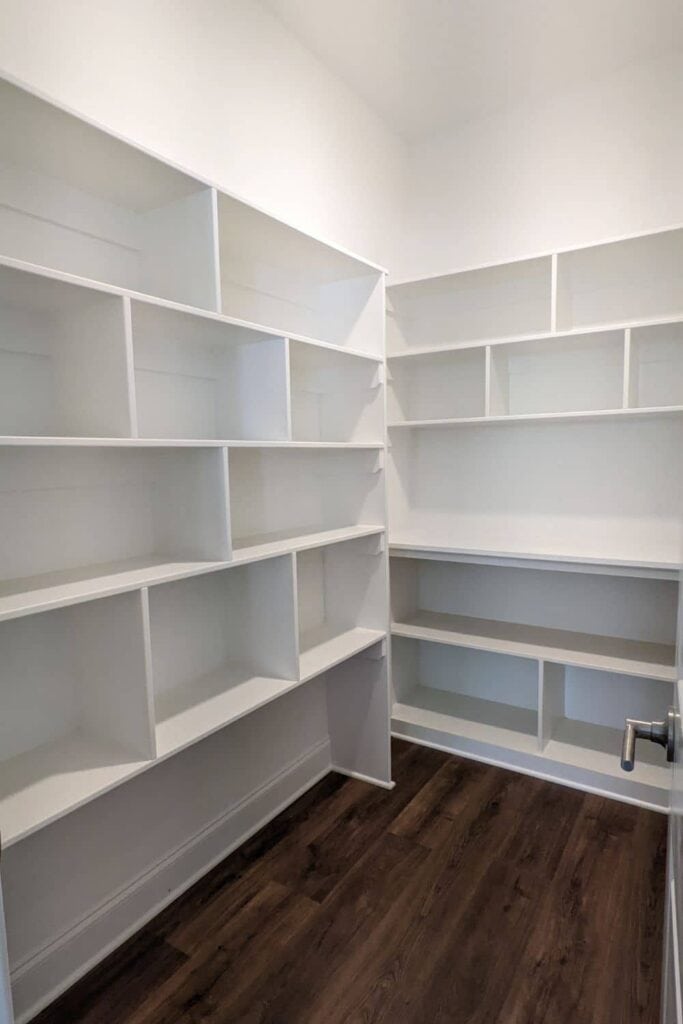
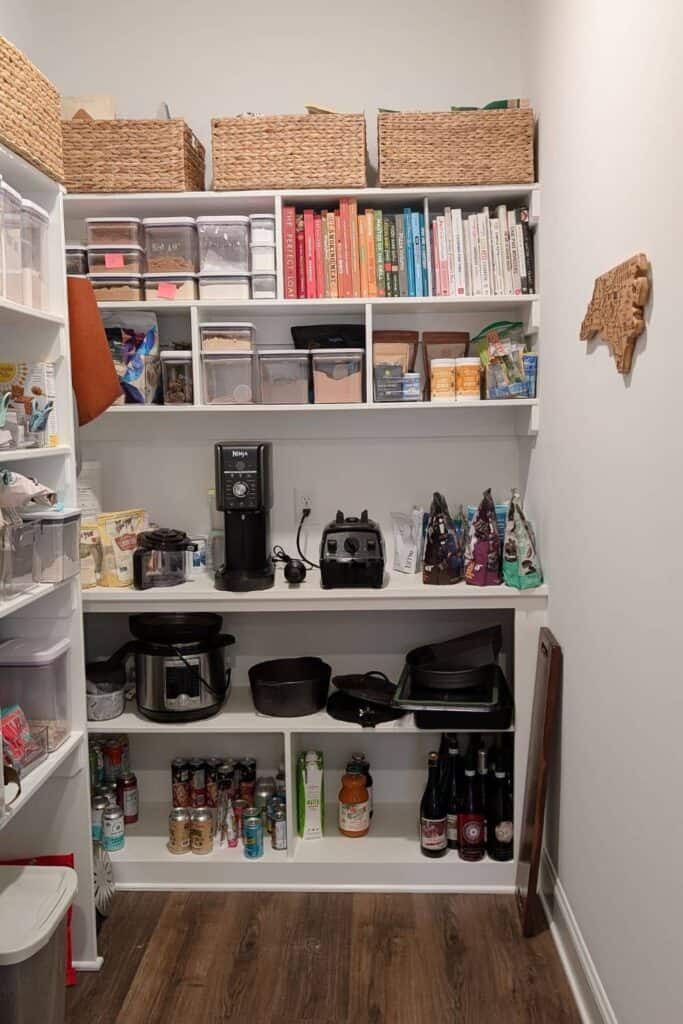
Like I said – it’s not bad. A lot of people would be thrilled for this to be their pantry. But it just didn’t function (or look) the way I wanted, so we decided to give it an update.
This post contains affiliate links for your convenience (which means if you make a purchase after clicking a link, I earn a teeny-tiny commission, but it won’t cost you a penny more)! Click here to read our full disclosure.
The Pantry Vision
There were a lot of different ways to go with pantry, so I went to SketchUp to mockup a few general layouts before deciding on a final design. Our pantry is 5′ x 9′ with 9′ ceilings for reference.
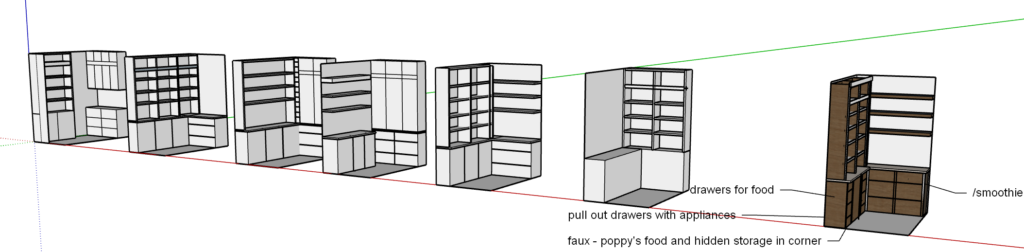
Regardless of the actual layout and design, there were a few must-haves:
- Hidden storage for small appliances like the instant pot
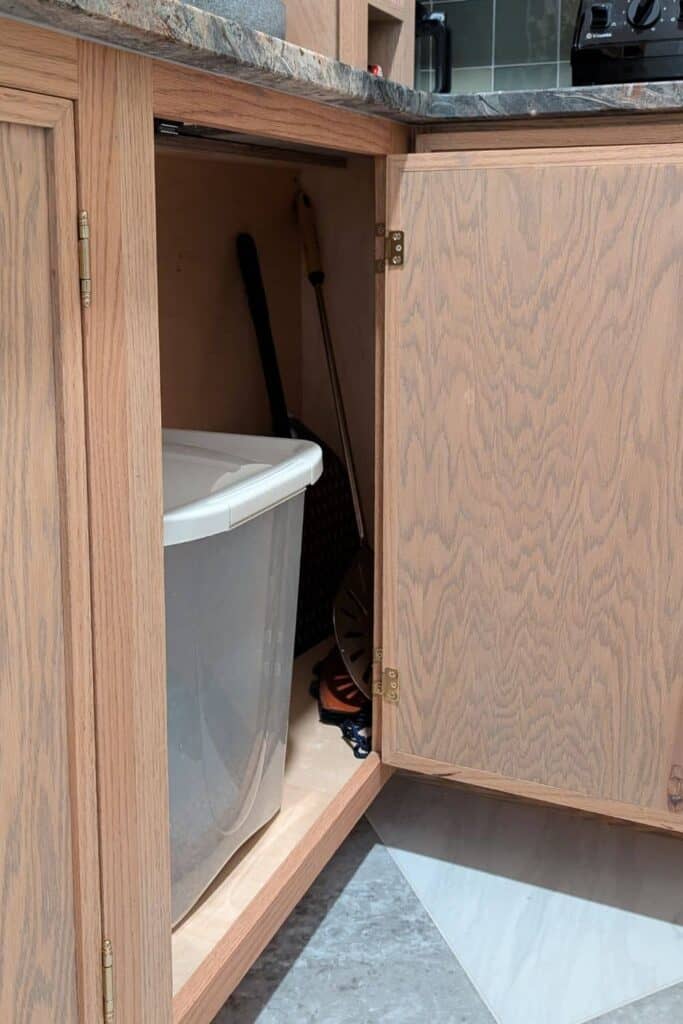
- Hidden storage for Poppy’s dog food (I literally designed one of the cabinets to fit her food bin)
- Make use of all of the space from floor to ceiling
- A butler’s pantry feel with actual cabinets and a countertop
- Shelves that actually fit the things I wanted to store on them
- Something pretty and functional
Once I decided on the general layout thanks to my quick SketchUp designs, I went to town measuring my non-negotiables (like Poppy’s food cabinet and exactly how much space I needed to be able to use my blender in peace).
Once I had those key measurements, I started making an actual plan.
The DIY Pantry Build
Step 1: Raise the Doorway
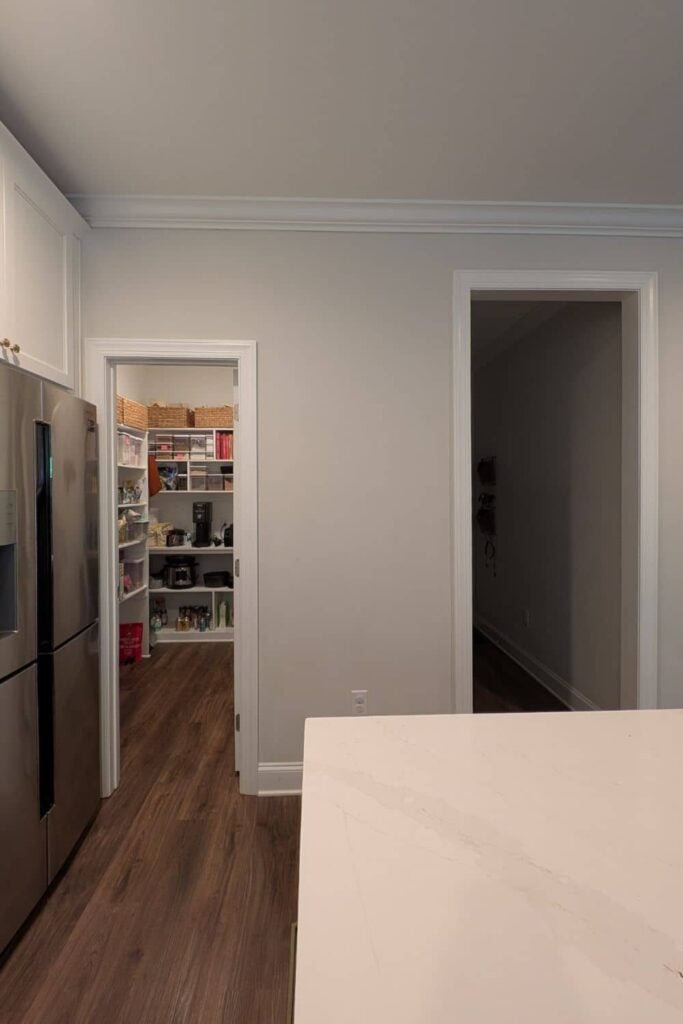
Okay this wasn’t necessary, but our pantry sits right next to our mudroom and the fact that the doorway was standard height while the mudroom was higher always irked me.
So, first step of this pantry project was actually raising to the doorway to match. We always kept the door to the pantry open and the space is tight, so we got rid of the door altogether. This instantly made the space feel bigger.
Step 2: New Floors!
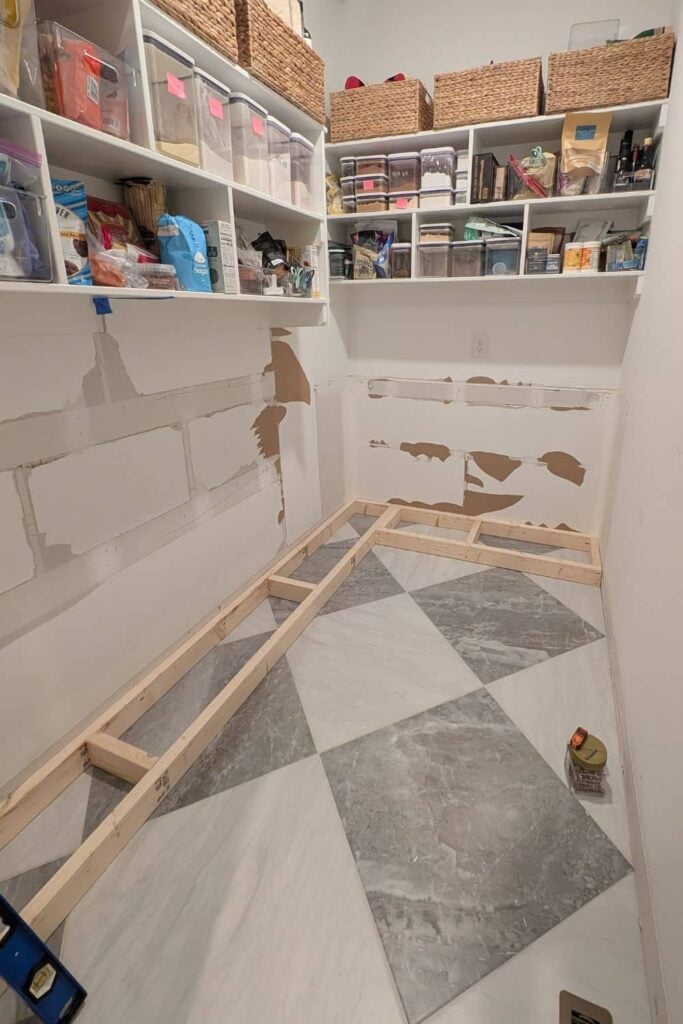
This is what really kickstarted the project. When we bought checked tile for our laundry room, I bought just enough extra to replace the flooring in both the mudroom and pantry to make them feel more custom and like separate spaces.
Instead of doing this ourselves, we decided to outsource the tiling this time, and it was worth every penny. We tiled the laundry room ourselves, and I hated every second of it. Me and tiling floors just don’t get along.
For the floors, we laid them as a diamond checkerboard. After getting over 30 samples, I finally decided on the Blair 24×24 tiles in the colors Volakas White and Oniciata Grey from Edward Martin.
At the time of writing this, they don’t actually sell this combo together, so I had to order the white and grey separately to make my own checker pattern.
Since we knew these would be in a higher-traffic area and potentially run into some wet shoes from time to time, we opted for the matte tiles.
Step 3: Lower Cabinets
We built this pantry in stages. We had a lot going on personally and knew we wouldn’t be able to dedicate a big chunk of time to building the pantry out like we would normally like to.
So instead of demoing everything up front, we demoed only what we needed to at any given time. This let us keep our pantry for the most part instead of living with food on the kitchen countertop for weeks or needing to set up some temporary pantry.
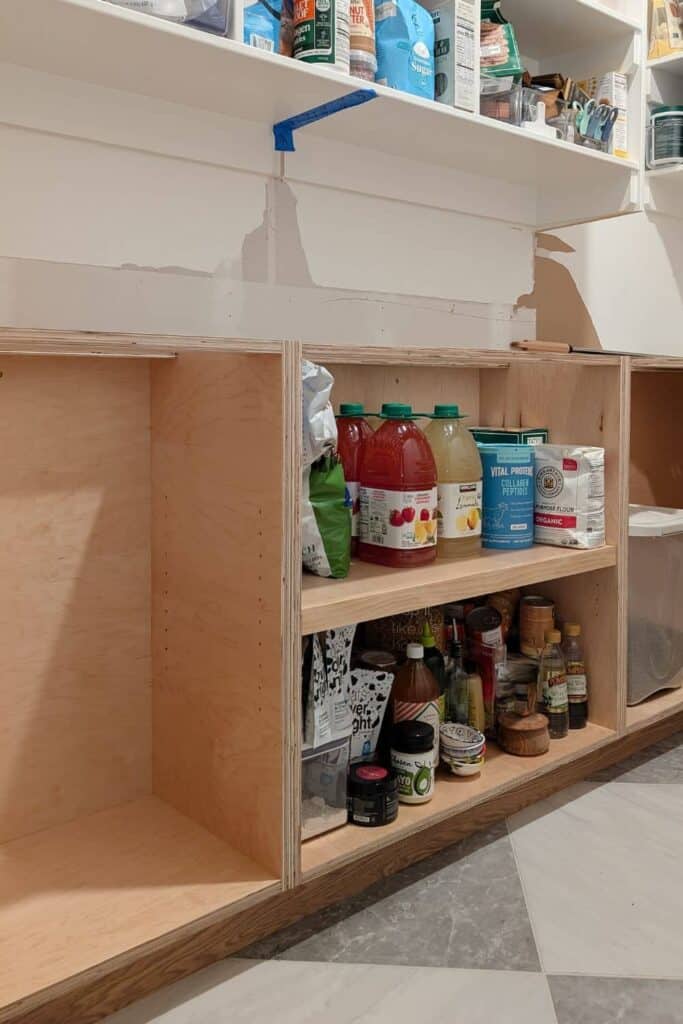
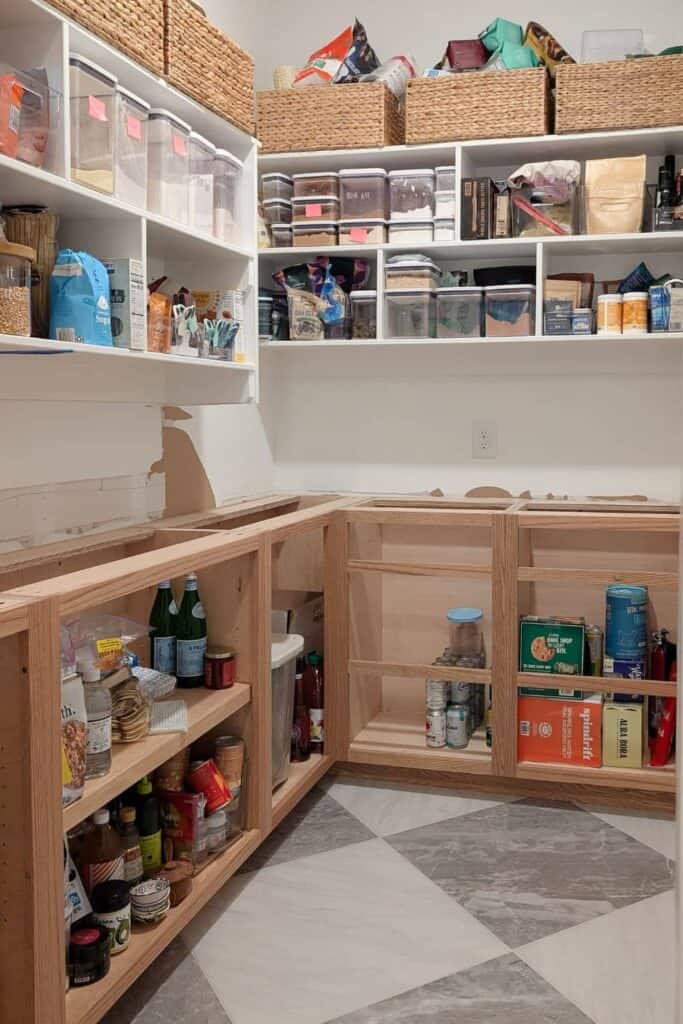
The first part of the build was making all of the lower cabinets. For the corner, we decided to do a blind corner cabinet, so when you look at it in the pantry, it looks like we might have wasted the corner.
In reality, the storage in that cabinet goes all the way back, so there’s no wasted space. In full transparency, I still need to add the DIY pull-out drawers that’ll make grabbing things out of that deep corner even easier, so consider that a “part two” coming soon.
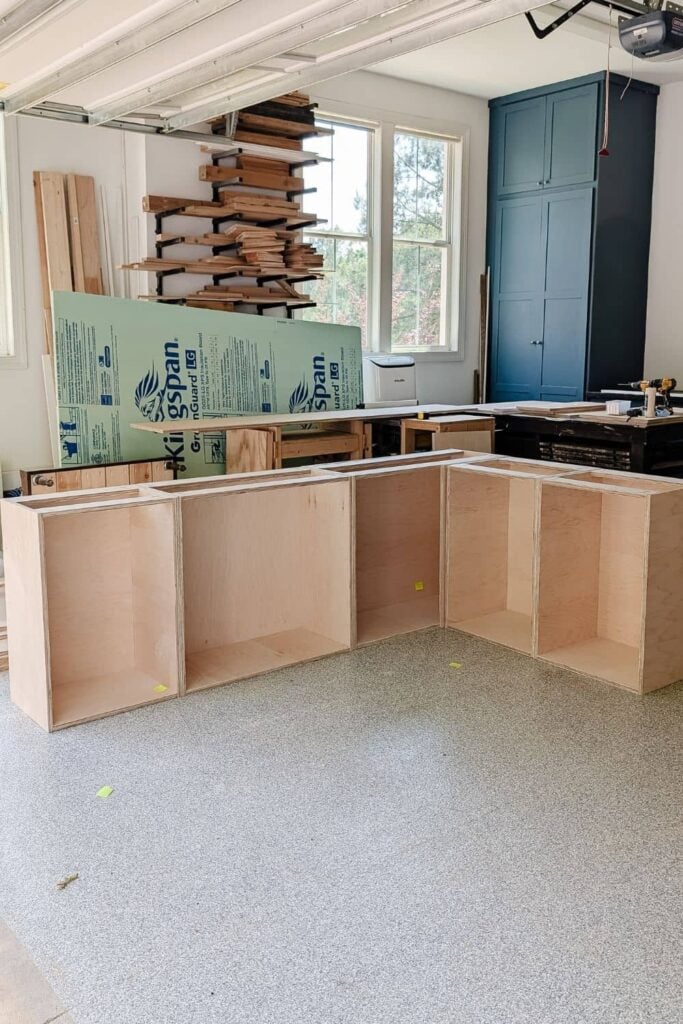
After installing all of the cabinet bases on a 2×4 toe kick, we added filler strips to close any gaps between the wall and cabinets and then nailed on 1/4″ plywood to cover up the 2x4s.
If you’re looking to build your own cabinets, we cover all things installation and building decisions in the DIY Cabinet Building Bundle, including toe kick options and scribing filler strips.
Typically, we would’ve installed the face frames to the cabinets before installation, but we were in a time crunch just trying to get the cabinets installed before the countertop installer came to template the space, so we just needed to get the base cabinets installed asap.
We instead assembled the face frames in the garage and attached them to the cabinets after installing the bases.
Step 4: Countertops
This is another thing we decided not to DIY. We’ve built wood countertops before and I’ve painted faux marble designs, but we decided to go with natural stone for this project.
Rather than pay for a full slab, we went to a few local slab yards and priced out the remnants.
Choosing from remnants saved us a LOT of money, especially since what we chose was a pretty high-priced quartzite. The challenge was trying to find something that would work.
We were very open to options: light, dark, bold, subtle. But because of the size we needed, our selection was pretty limited.
We actually picked out an option, put down the deposit, and scheduled the installation. Before they went to fabricate it, they sent us a picture of the two pieces they were planning to use.
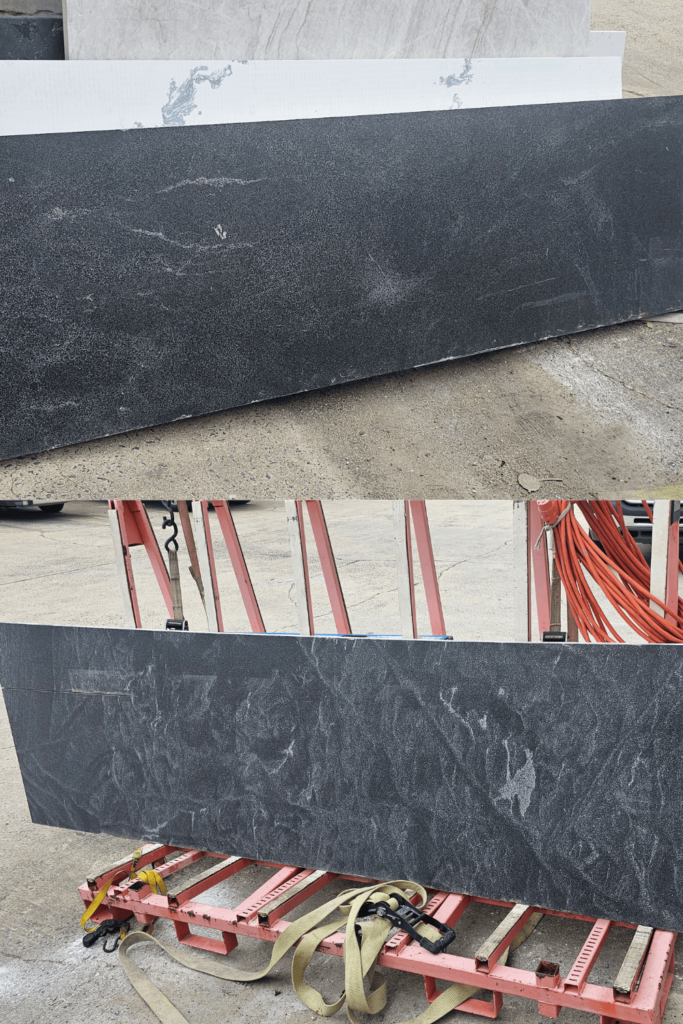
Because of how the pieces were laid out at the slab yard, we only saw a little piece of each of the pieces. When they pulled them out, they were different than expected and varied a lot between the two slabs, so it was back to ground zero.
We made our way back to the slab yard and had two options. One white with dark black veining and then the one we ended up choosing.
A few weeks go by, and they finally have time to fabricate and install. It starts pouring rain on the 40-minute drive to our house and they arrive to install it. I’m sitting in my office, and I heard a loud sound.
“Did they just break our countertops???” I hear them on the phone, and the tone doesn’t sound great.
I get a call from the slab yard. Yup. The countertops broke during install. After having to change countertops entirely and then multiple delays for getting them installed, they broke.
This is when I almost gave up on the whole idea and was just going to DIY my own wood countertops and paint the cabinetry instead.
LUCKILY the slab yard had another remnant of the exact same stone that was actually big enough for our space! A couple weeks later. It was successfully installed and it’s BEAUTIFUL.
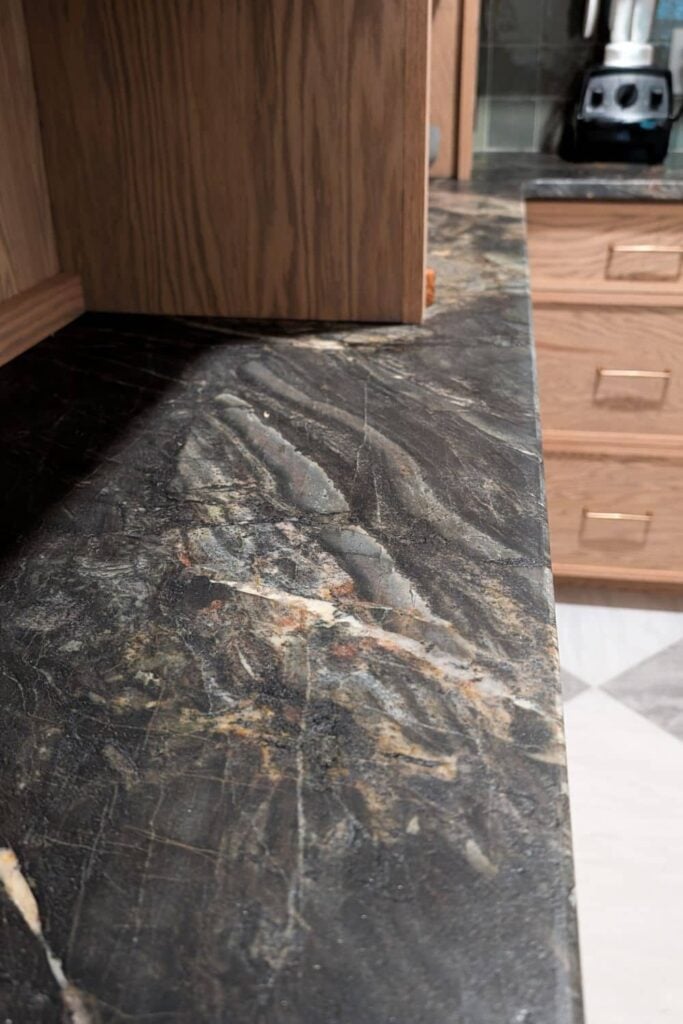
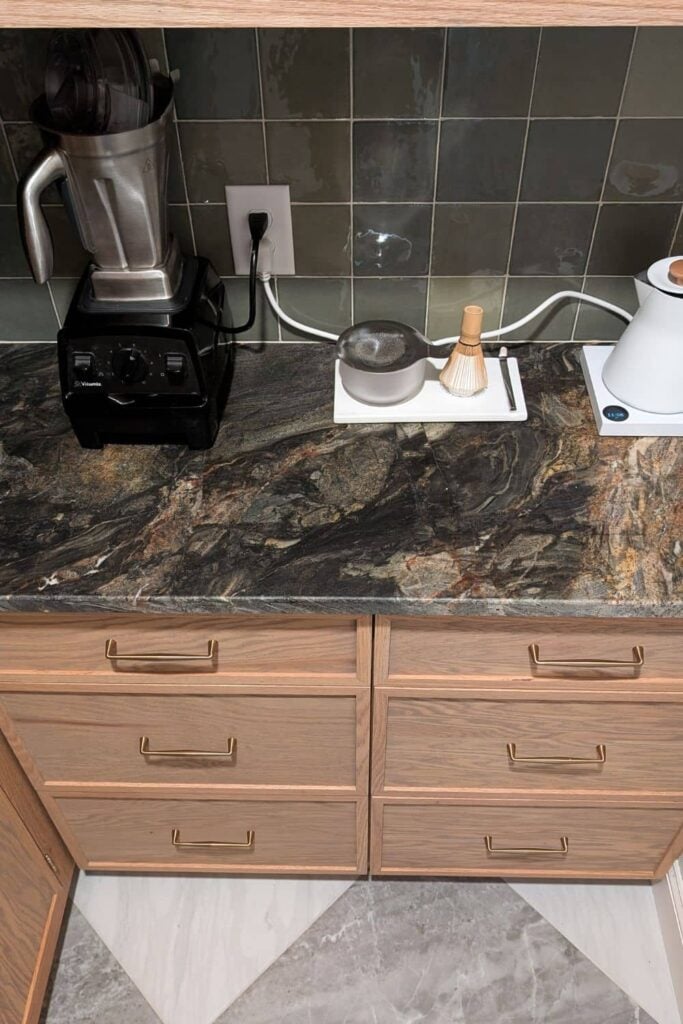
Unfortunately, I don’t know exactly what type of quartzite it is since the slab yard priced their remnants the same regardless of level/type and at this point in the process, I was too exhausted to think to ask.
During all this, we assembled and installed the face frames, which made the cabinets feels so much more complete.
With all the delays, we were very thankful that we hadn’t ripped out all of the pantry shelving from the get-go. Yes, we had some storage in the cabinets below, but the hutches are our main storage and those couldn’t go up until after the countertops were installed.
Step 5: Floating Shelves
While we waited on countertops, we used the time to build the floating shelves for the back wall. This was actually our third time building floating shelves, and we’ve done it a different way every single time.
For the pantry, we used a 2×3 for the support so that it could hold more weight than a 2×2. Don’t ask me how much more weight, I have no clue and will never provide weight limits because it depends on way too many factors.
Instead of assembling the shelf first and then sliding it onto the supports, we built it in place. We screwed the 2×3 to the wall, then secured the brackets to the 2×3 using pocket holes.
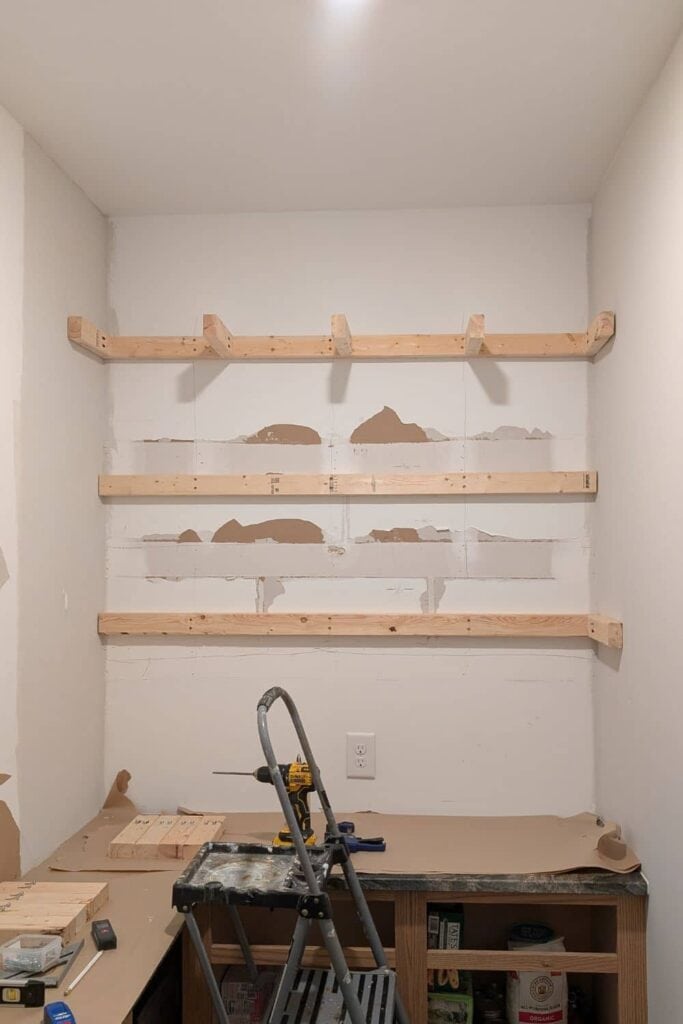
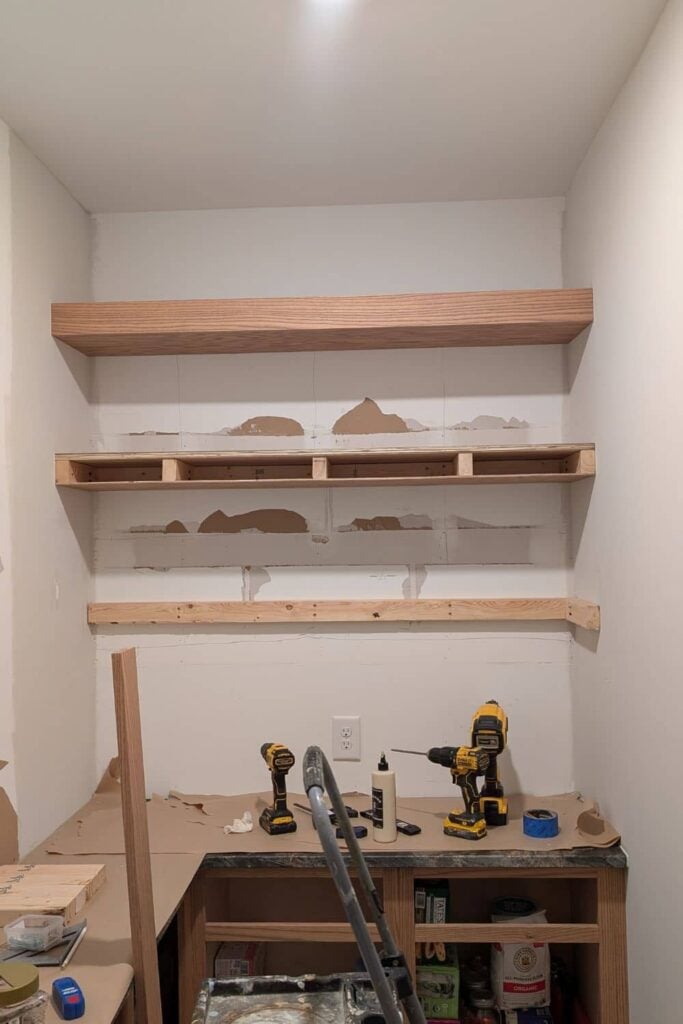
Then we nailed on a ¾” plywood top, a ¼” plywood bottom, and a 1×4 oak face board.
In the past, we’ve used 1/2″ plywood for both the top and bottom, but 1/2″ oak has been almost impossible to track down lately, so we used what we had instead.
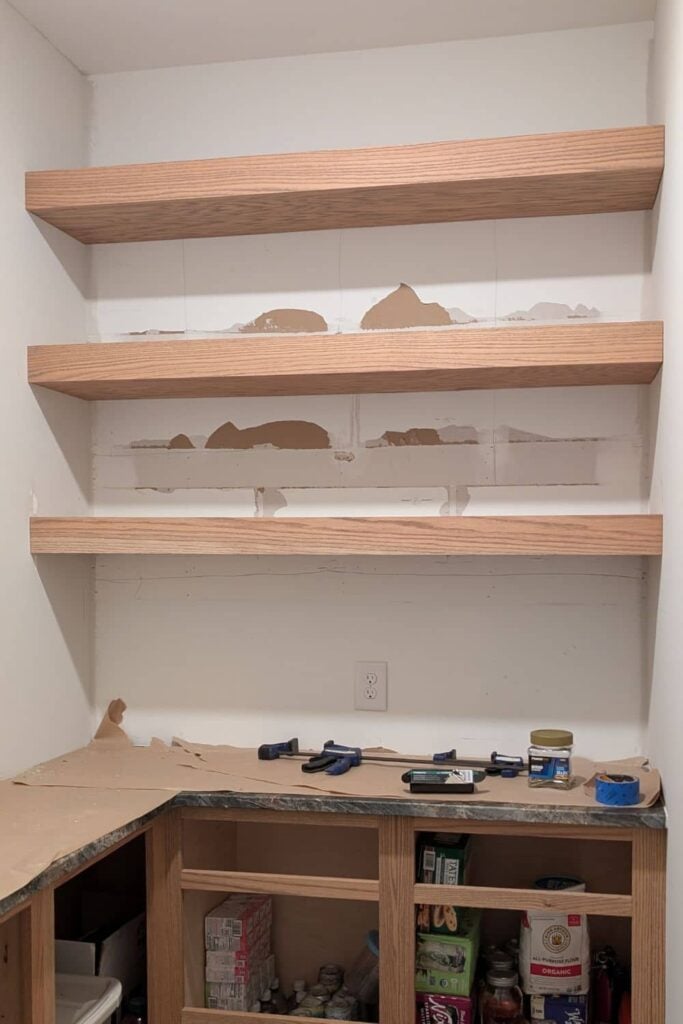
Before you tell me that my floating shelves are too high, I spent a lot of time determining the exact placement of them, okay?
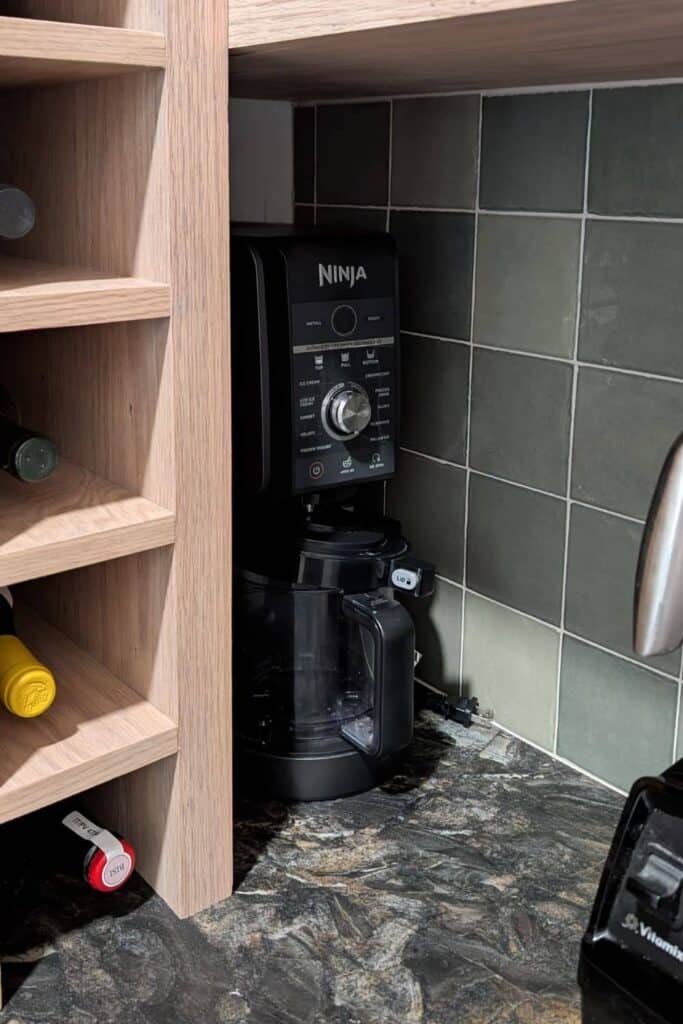
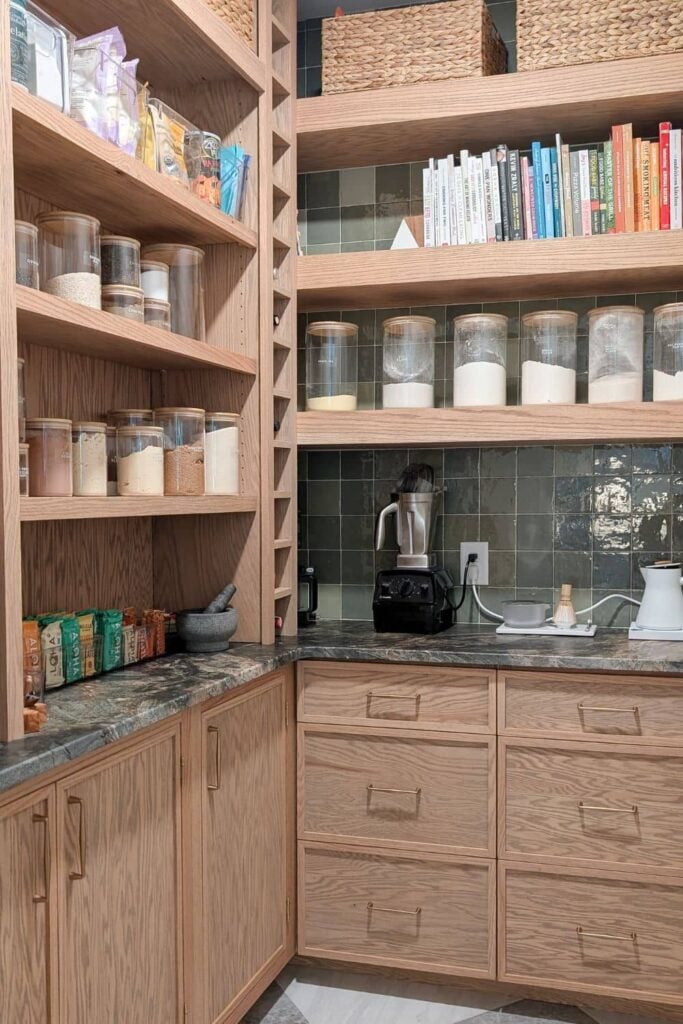
The bottom shelf allows enough room for me to use my blender and Ninja Creami in peace. The top shelf is placed where it is because we may or may not have future plans to add a removeable ladder to the space ;).
Step 6: Hutches and Wine Rack
Once the new countertops were finally in without a crack and we installed the floating shelves, we were able to get the hutches and wine rack installed as well.
The hutches are just large upper cabinets, but instead of a full bottom, we just added a stretcher to the back of the bottom.
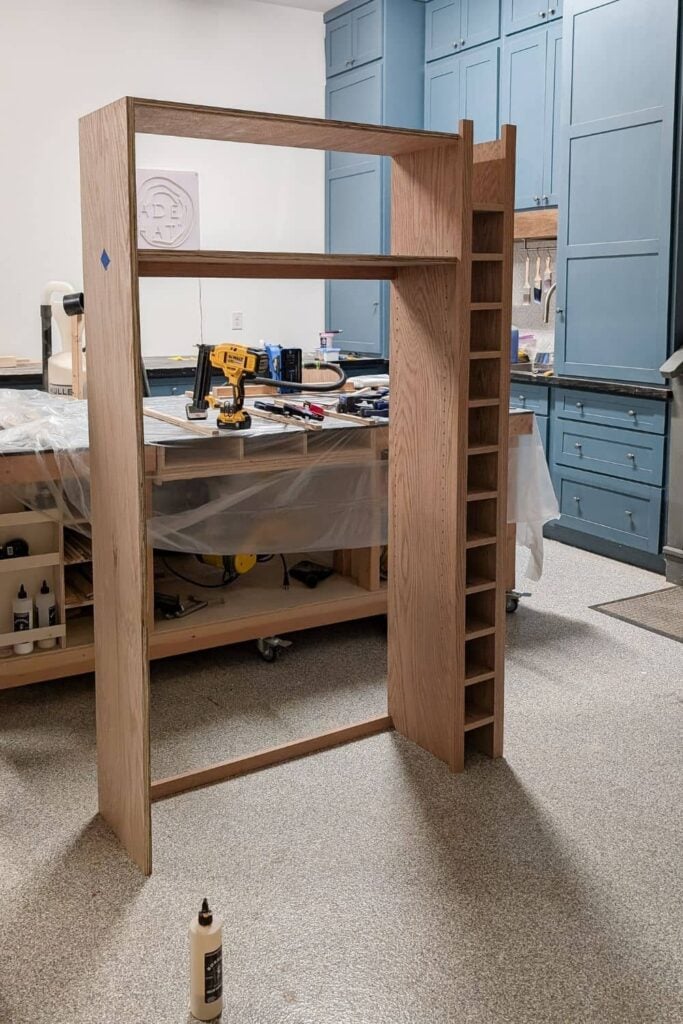
We wanted to add a little detail, so we used our Kreg Accucut to cut grooves into the back of the 1/4″ plywood to get a paneled/shiplap look.
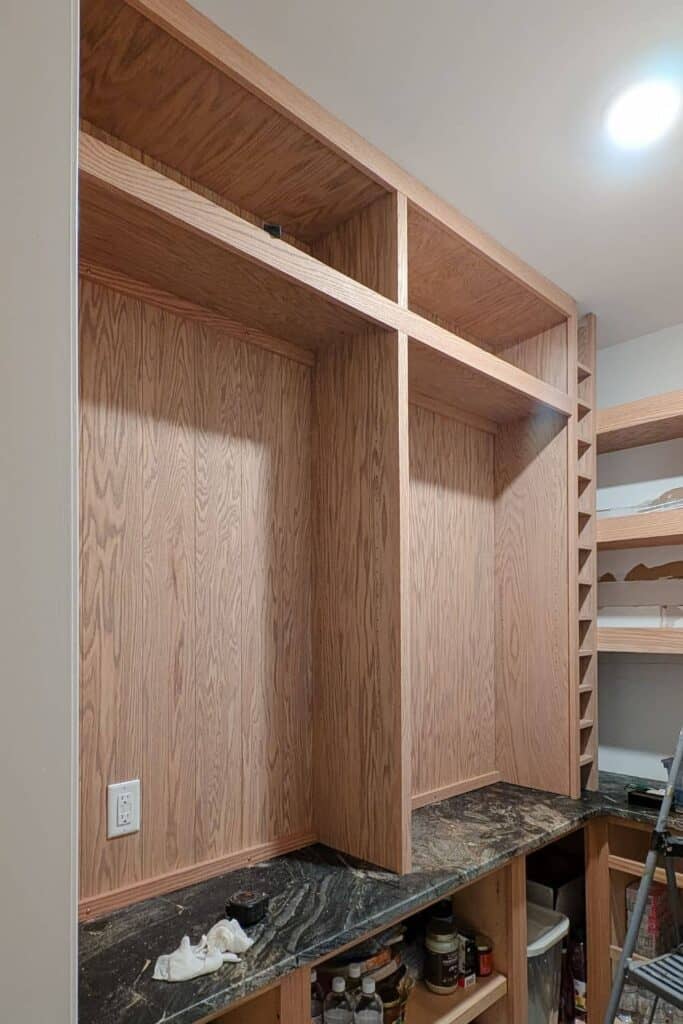
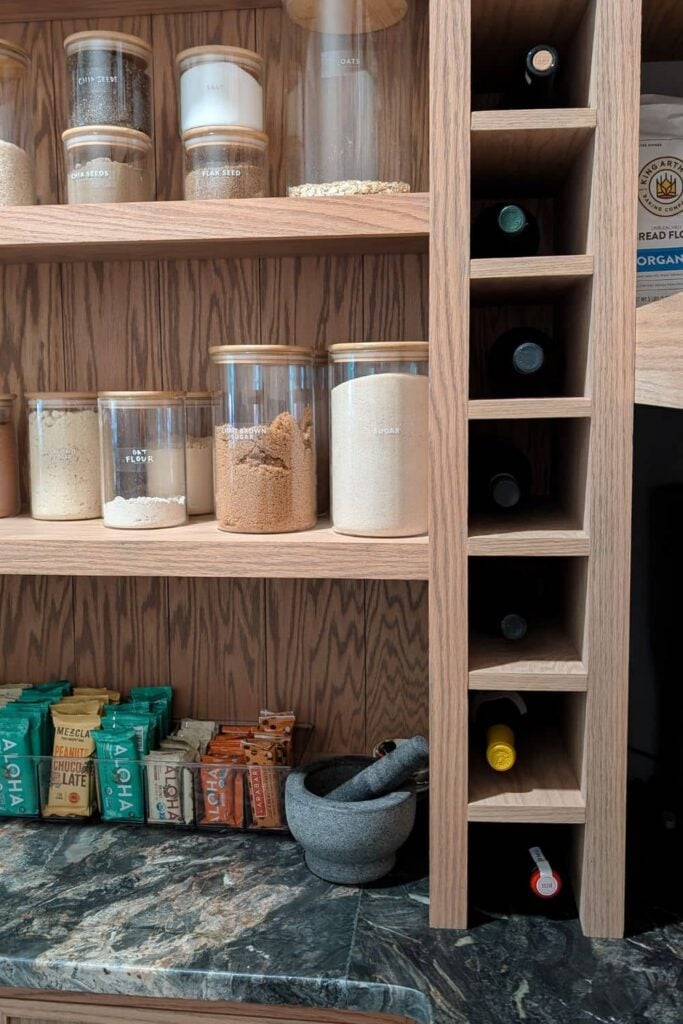
Since I was so burned in the past by my shelves being the tiniest bit too short to fit what I wanted, we opted to make all of the shelves adjustable for maximum flexibility in the future.
We also added in a small wine rack one side between the hutches and the floating shelves for a little extra function.
Now that the hutches and wine rack were in, we actually have a little semi-hidden storage on the floating shelves. The bottom nook fits our NInja Creami perfectly. It’s like it was designed that way 😉
Step 7: Drawers and Doors
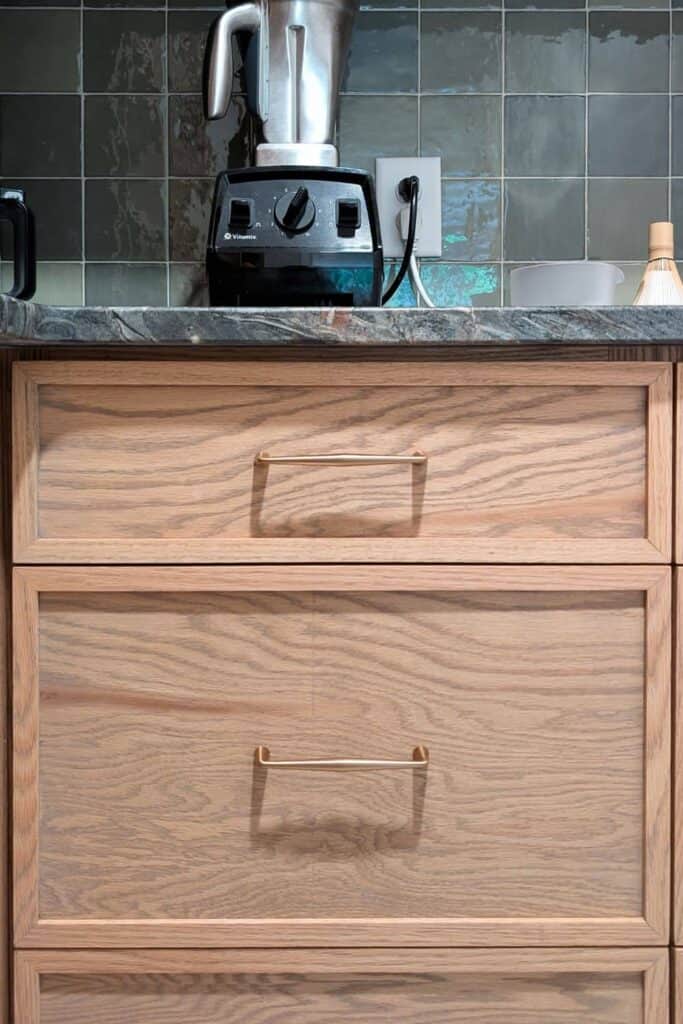
We also added drawer stacks for snacks, drinks, and all of our “smoothie station” supplies. After many, many requests, finally used undermount slides for the first time for these.
Honestly…I still don’t get the hype. They’re noticeably more expensive than side-mount ball-bearing slides, they’re not any easier to install, and your drawer box actually loses almost as much width (5/8″ instead of 1″) while also losing another ½” of depth to the drawer box itself.
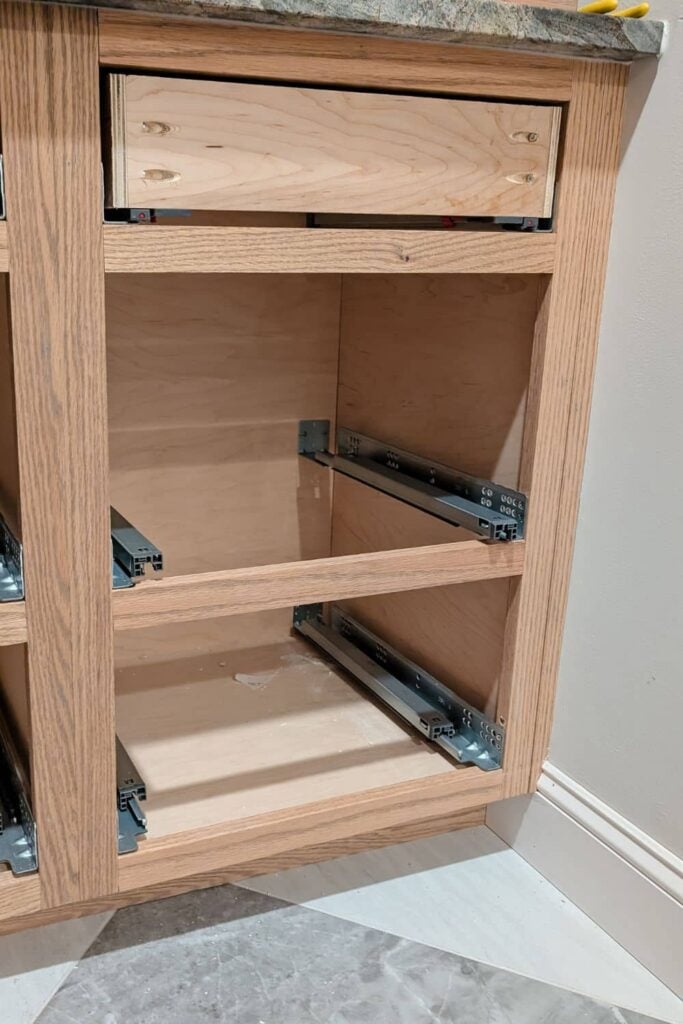
The main selling point is that you can’t see the slides when the drawer’s open, which isn’t something I personally notice when I use a drawer. If you’re team undermount and you disagree, I’d genuinely love to hear why in the comments. So far, I’ve only gotten messages saying they aren’t that special, so at least I’m not alone?
After living with them the past few weeks, they are very smooth, but I wouldn’t say they are noticeably smoother than my soft-close ball-bearing slides?
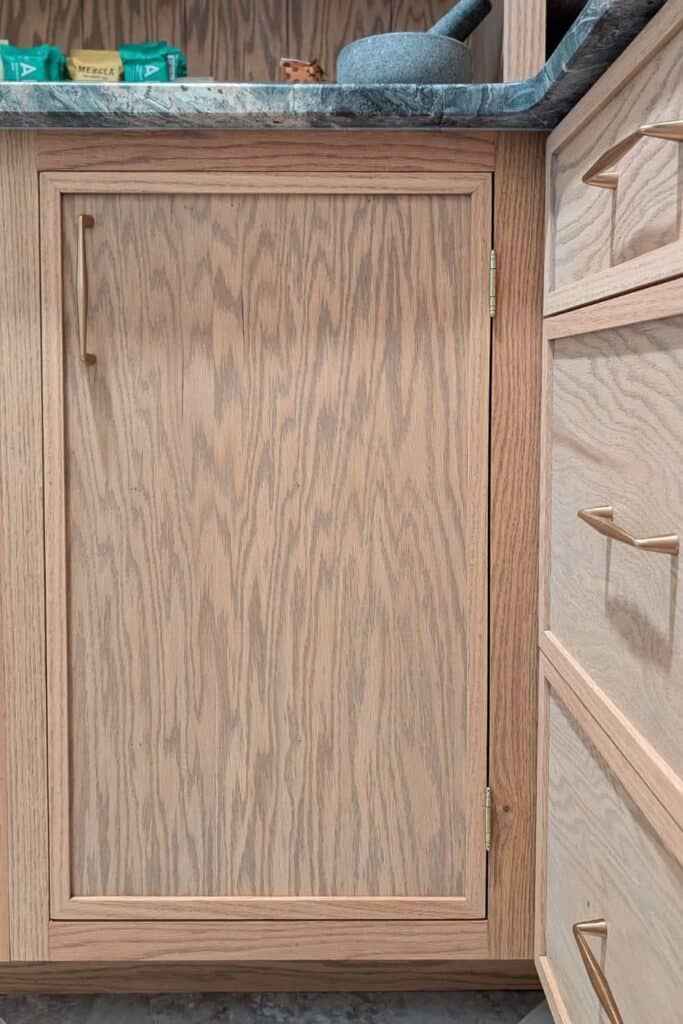
Anywho, after getting those installed, we installed the skinny shaker drawer fronts and doors.
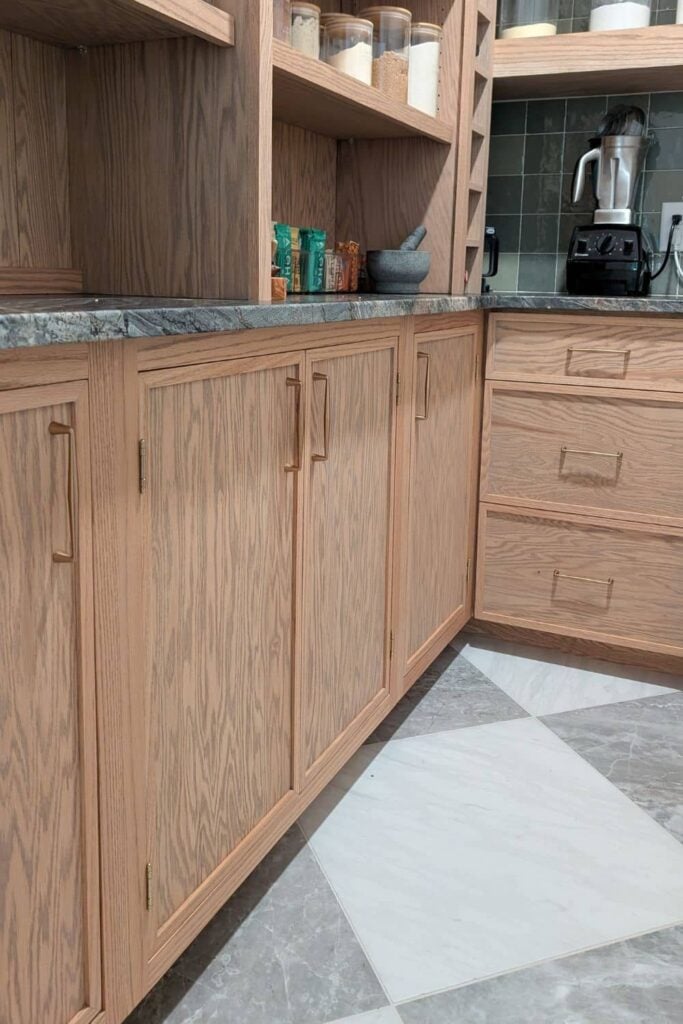
For the doors, we actually ran into a bit of a pickle.
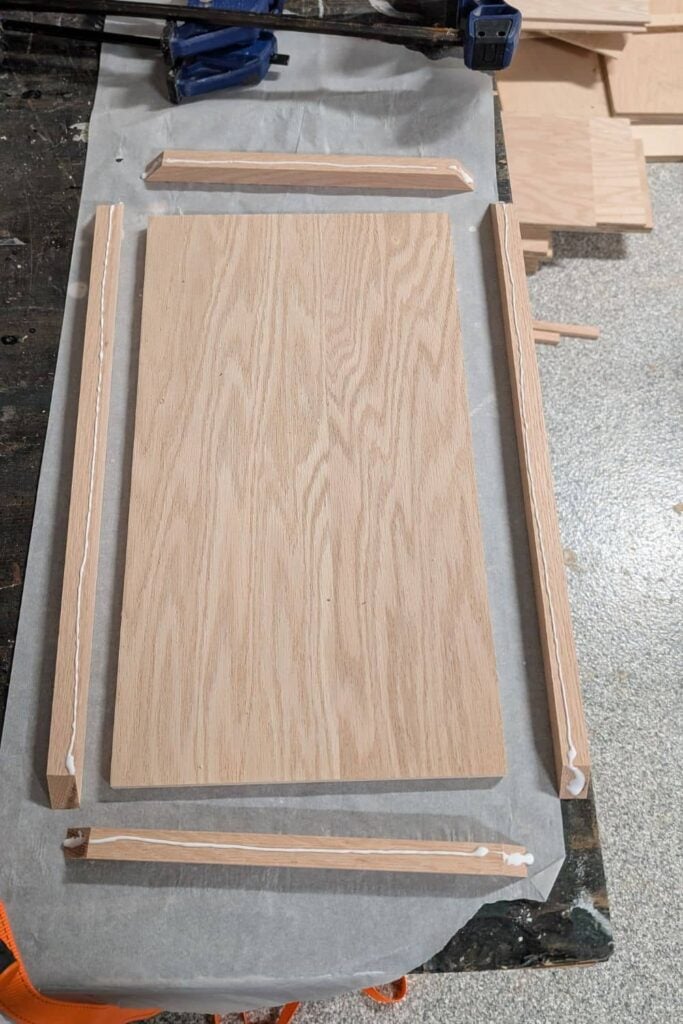
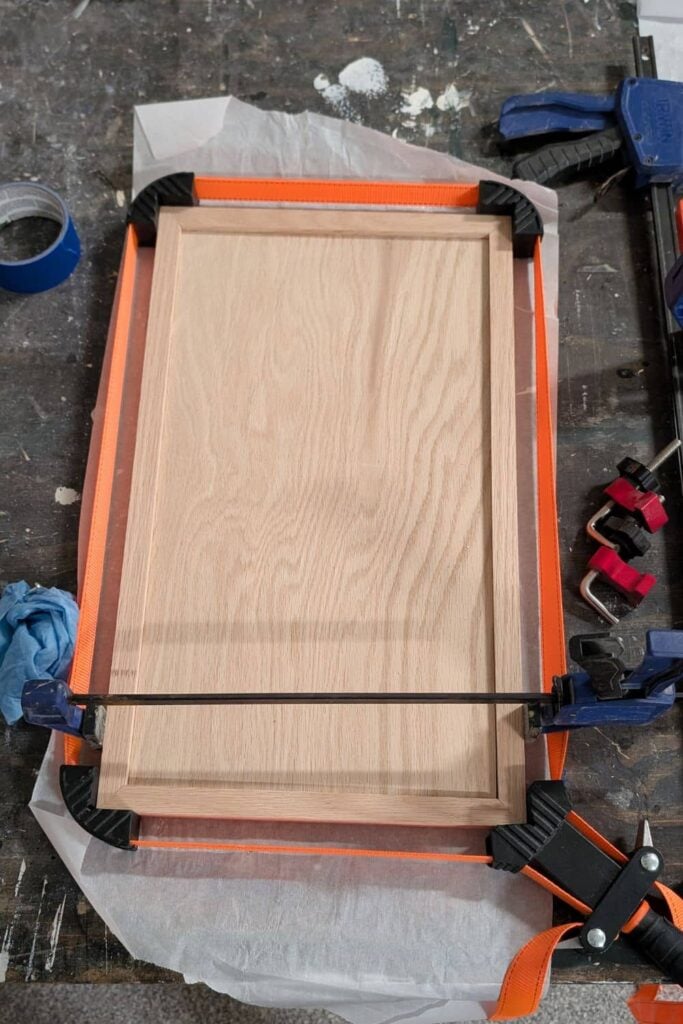
Traditionally, I’ve made my skinny shaker doors with 3/4″ plywood and 1″ strips of wood. For overlay, I haven’t really found this to be a problem, but for inset, a thicker door can make things tricky. The doors can scrape since they are little thicker than what the hinges were designed for and though we have hacks to make it work, your gaps generally have to be a little bit bigger.
So one day, I had the brilliant idea of using 1/2″ plywood instead, which would make the final door thickness a traditional 3/4″. Great. Problem solved.
I made the doors and then had the realization…concealed hinges are drilled into the door panel about 1/2″ deep.
Ugh. That means I would drill through the whole plywood center since the skinny shaker is so skinny.
So I tried to make my life easier and ended up making it just as difficult, just in a different way.
We found some hinges that were a little different than the non-mortise hinges we typically use when we aren’t using concealed hinges.
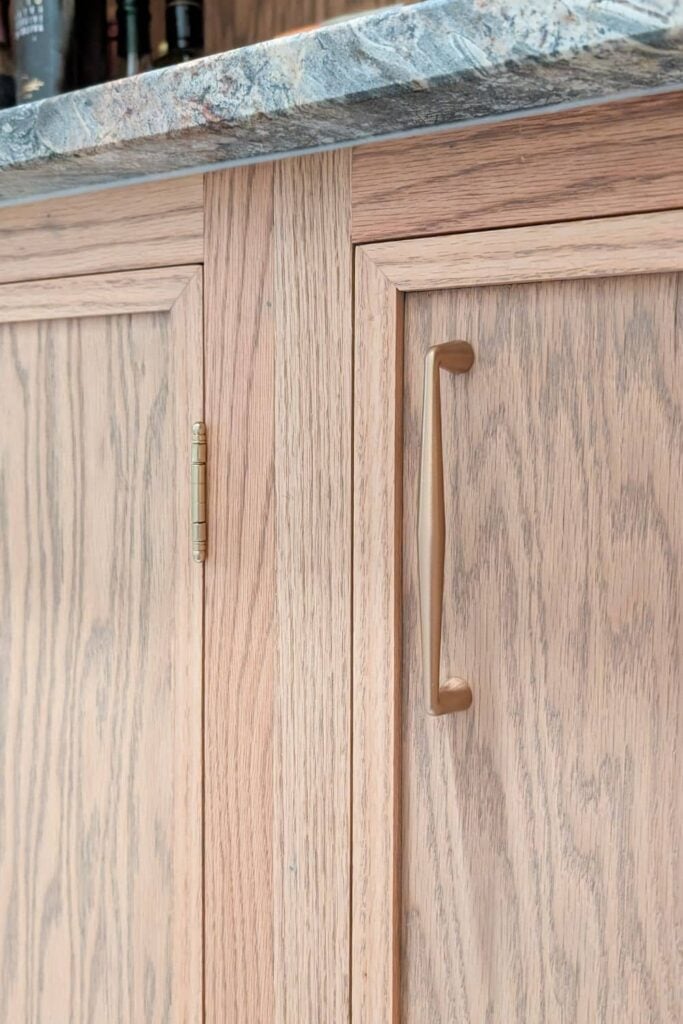
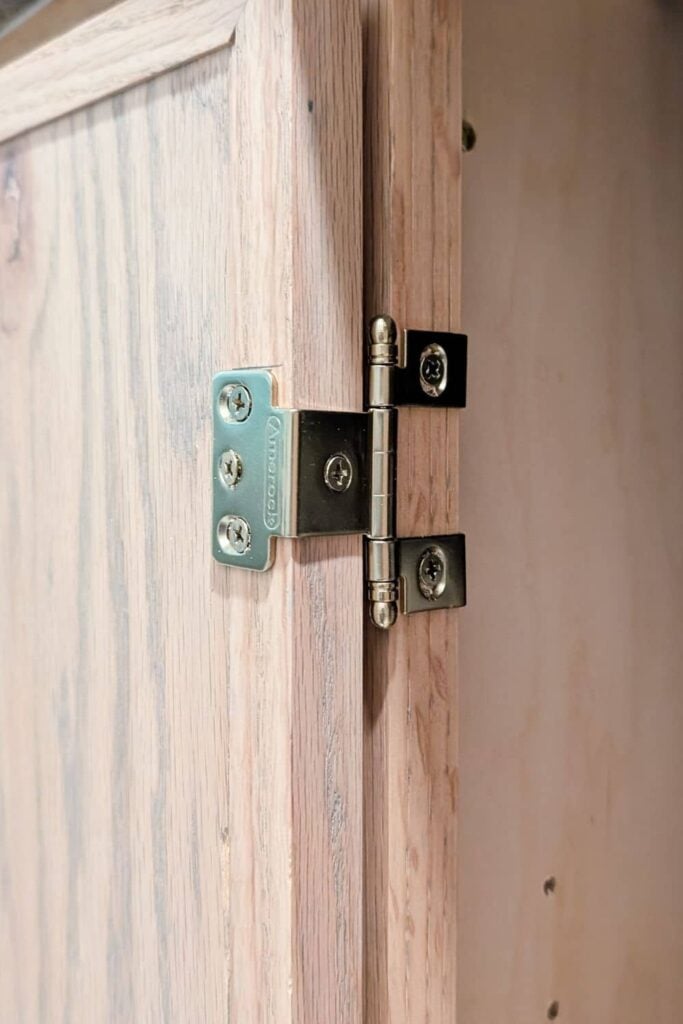
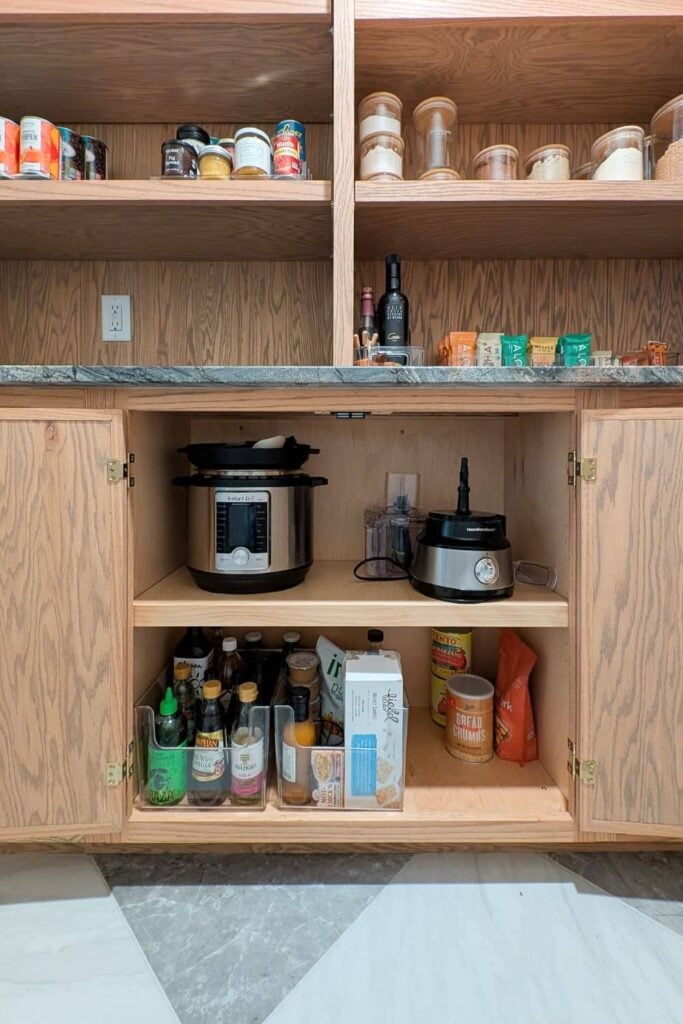
We tried them out and they were actually really great. Now the doors can open all the way, which is especially nice in a smaller space.
So this DIY fail turned into a DIY win. Now we have another hinge solution in our back pocket for future projects!
Step 8: Tile Backsplash
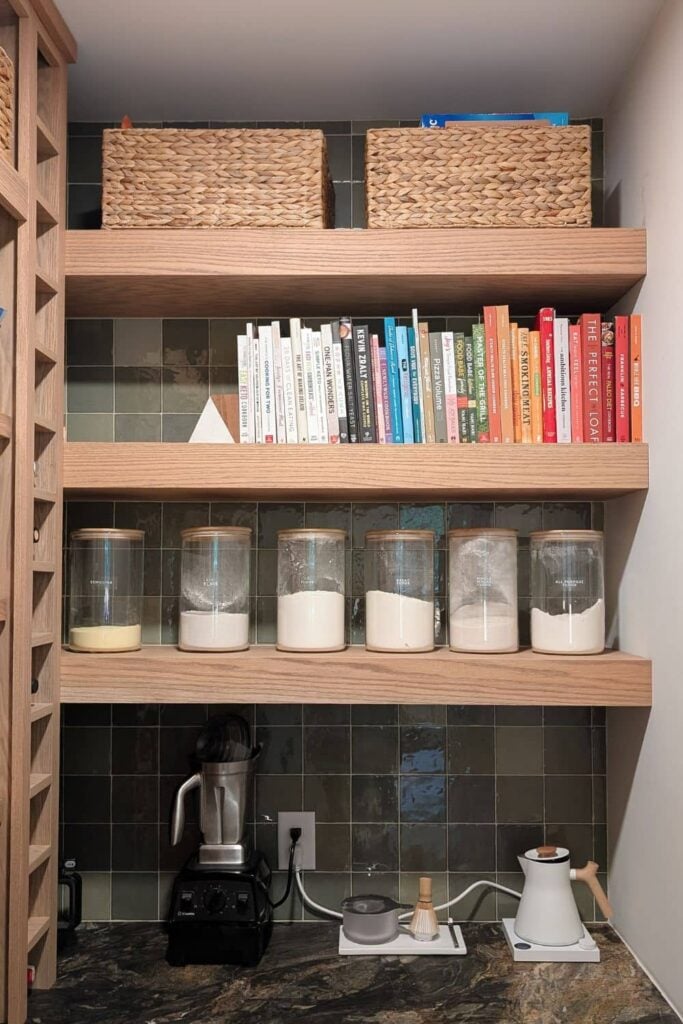
The last part of this pantry renovation (until we add the ladder in the future) was the tile backsplash. We skipped the mortar (which is my least favorite part of tiling) and used MusselBound, which is basically a giant sheet of double-sided tape for tile.
With this stuff, the tiling is done at a much more satisfying pace. Yes, you need to cut tiles around outlets and edges, but the bulk of the tiles go up so quickly!
We grouted it to finish things off and then caulked between the shelves and tiles with a caulk that matched the grout.
Step 9: Organize!!
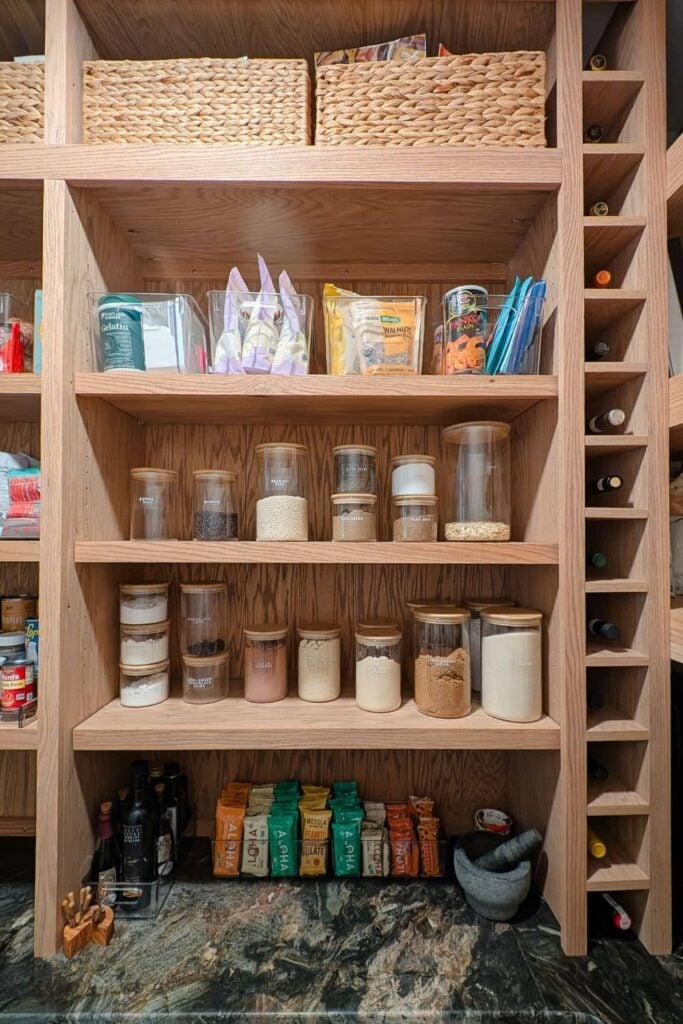
This is my personal favorite part of a pantry project. What can I say – I just love a container.
In case you do too, here’s what we used in our pantry:
- Flour and sugar glass containers
- Medium glass containers (quinoa, cocoa powder, nut flours, etc.)
- Smallest glass containers (baking soda, baking powder, etc.)
- Labels (fair warning: she doesn’t have a label for cornstarch???)
- Plastic storage bins (these are amazing for grouping different types of food groups (breakfast, excess baking, etc.) because everything has a place and it’s so much easier to grab and find what you’re looking for.
- Larger plastic storage bins
- Plastic storage containers with dividers (great for drinks powders or granola bars)
- Lazy susan for spices and oils
- Tiered can storage (fair warming: the two pieces are slightly different heights, so you can’t really use it as a single longer shelf)
- Seagrass baskets are discontinued, but they were from Target
A Quick Note About Shelf Heights
I mentioned this earlier, but whenever I share a project with any sort of upper cabinet or shelf, people love to talk about its unusable and “we must be giants” and how they could never reach that.
First off, that’s the beauty of DIY. If it’s too tall for you, that’s fine. Make things shorter when you build them.
Second, I would rather have the option of extra storage that requires a stool than no extra storage at all because I didn’t want to build things too high.
Third, my husband is really tall and can actually reach every single thing in the pantry without a step stool. But, I’m only 5’4″ and since things are in containers, I can reach everything except for the very top shelves. For those I need a stool, but I needed a stool to reach the top shelf in our old pantry layout too. What we store up there is just “backstock” anyway, so it’s only accessed when we run out of something on the lower shelves.
Fourth, we’re planning to build a removeable ladder eventually that will actually work in both our pantry AND our mudroom. It’s going to be cool.
So anyway, we built what we wanted and what works for our family. If that’s different than what works for you and your family, that’s cool. That’s the beauty of DIY – being able to customize things to fit YOUR needs and preferences.
Colors + Finishes
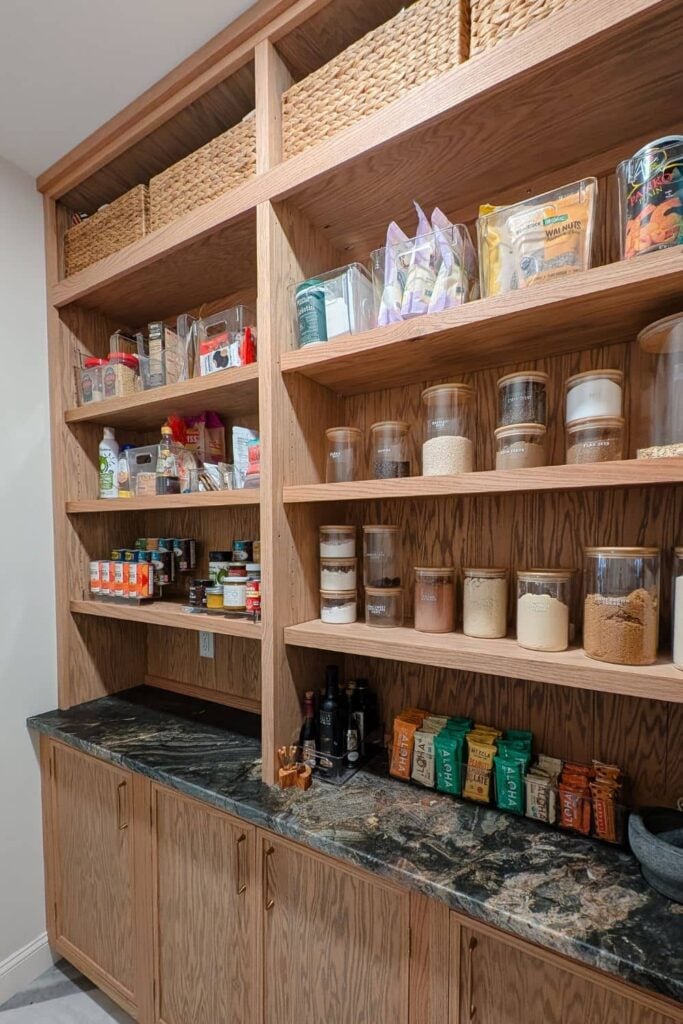
- Cabinets, hutches, and floating shelves: Red oak + red oak plywood finished with Rubio Monocoat Oyster
- Walls: Sherwin Williams Drift of Mist
DIY Pantry Supplies Links:
- Green Tile
- Checkered Floor Tiles (colors Volakas White and Oniciata Grey)
- MusselBound
- ¾”x4x8 of Maple Plywood (used for cabinet boxes)
- 1/2″x4x8 Maple Plywood (used for drawer boxes)
- 1/2″x4x8 Red Oak Plywood (used for door + drawer fronts)
- 3/4″x4x8 Red Oak Plywood (used for hutches and shelves)
- 1/4″x4x8 Red Oak Plywood (used for hutch backs, floating shelf bottoms, toe kick cover)
- 1x4x8 Red Oak (floating shelf fronts)
- 1x2x8 Red Oak (face frames)
- 1x3x8 Red Oak (top trim, filler strips, and cut down for skinny shaker sides)
- 2x3x8 (for floating shelf bracket)
- 2x4x8 (toe kicks)
- Drawer pulls + door handles
- Undermount drawer slides
- Hinges for cabinet doors
- 1” Foam Insulation Board
- 2.5” Cabinet Screws
- 3.5” Wood Screws
- 1.25″ Softwood Kreg Screws
- Minwax Wood Putty in Classic Grey
- Painter’s Tape
- Delicate Surfaces Painter’s Tape
- Titebond 2 Wood Glue
Tools We Used:
Note: you do not need all of these tools and jigs to build something like this. We’ve accumulated a lot of little things over the years that make things easier, but many are not required.
- Circular Saw
- Kreg Rip Cut Cutting Guide
- Kreg Accu-Cut Cutting Guide
- Random Orbital Sander
- Miter Saw
- Drill
- Kreg 520 Pocket Hole Jig
- Dewalt Brad Nailer
- Dewalt Table Saw (to cut the strips for the skinny shaker doors)
- Kreg Multi-Mark Tool
- Adjustable Clamp Pony (great for the skinny shaker doors)
- Kreg Face Frame Clamp
- Easy Read Tape Measure
- Laser Measuring Tape
- Large Level
- Magnetic Stud Finder
- Irwin Quick Grip Clamps
- Kreg Quick-Flip Drill Bit
- Kreg Drill Guide
- Kreg Shelf Pin Jig
- WorkTunes Headphones
- Safety Glasses
Want to tackle your own custom cabinetry project?
If you’re feeling inspired and want to tackle your own custom cabinetry project, we created the Cabinet Building Bundle to demystify DIY cabinet building.
It walks you through building and installing cabinets, doors, and drawers step-by-step. It’ll also walk you through pros and cons of different build methods and cabinet styles (did someone say inset or overlay? what about face frames??)
It also includes custom sizing calculators that we personally put to work every time we build a custom cabinet, or add a door or drawer to any project.
If you’re ready trade in settling for it “almost works” for truly custom spaces that are designed for you, the Cabinet Building Bundle might be a great place to start.