


Price
Time
Difficulty
This post was sponsored by Krylon. All opinions are my own. This post also contains affiliate links for your convenience (which means if you make a purchase after clicking a link, I may earn a small commission, but it won’t cost you a penny more)! Click here to read our full disclosure.

As the weather starts to warm up, we have all the outdoor projects and yard games on our mind. This season, we set out to build the ultimate DIY cornhole boards.
So what exactly do the ultimate cornhole boards entail? Glad you asked. These plans include:
- cup holders
- scoring system
- bean bag storage
- an easy carrying solution
- AND they are nice and light to carry
The great thing about these DIY cornhole boards is that you can add as many or as few of the features as you wish. They are all pretty simple to add, but if you’re not interested in a particular feature, you can simply skip that step to make your perfect cornhole boards.
Alright, let’s start DIYing!
Tools
- Miter Saw
- Jigsaw
- Drill
- Kreg Pocket Hole Jig
What You’ll Need
- (5) 1x4x8 board (we used pine)
- (2) 1/2″ 2’x4′ plywood project panel OR corn hole board tops
- (1) 3/8″ dowel
- 3/8″ drill bit
- 1.5″ paddle bit
- Wood glue
- 1″ outdoor Kreg screws
- 1.25″ outdoor Kreg screws
- Sandpaper (120, 180, and 220 grit)
- Painter’s tape
- Tarp for painting
- Krylon Fusion All-In-One in Matte Ink Blue
- Krylon Fusion All-In-One in Matte Beach Glass
- Krylon COLORmaxx in Matte Aqua
- Minwax Pre-Stain Wood Conditioner
- Minwax Wood Finish Stain (we used Special Walnut)
- Minwax Pro-Series Spar Urethane in Semi-Gloss
- Purdy XL paintbrush
- Clean rags
- (2) Latches
- (2) Take Apart Hinges
- (4) 3/8″ Carriage Bolts – 2.5″ long
- (8) 3/8″ Washers
- (4) 3/8″ Winged Nuts
- (42) 20mm Wood Loop Beads (will be used for scoring)
- Corn Hole Bags
When choosing your Fusion-All-In-One spray paint, keep your eye out for the new cans that mention the 5x stronger adhesion. Krylon Fusion All-In-One with 5x stronger adhesion even has a no peel guarantee! No sanding or priming needed for all your spray paint projects with 5x.
Prefer printable plans? Grab your cornhole board plans HERE.
How to Make And Spray Paint Cornhole Boards
New to DIY? We put together a free training to help you get started! Watch it HERE.

STEP 1: MAKE YOUR CUTS
Cut your 1×4 boards down according to the cut list below, or grab the printable plans to see the visual cut list that minimizes board waste.
| For What? | Size (in) | Quantity |
| Base – Long Sides | 48 | 4 |
| Base – Short Sides | 22.5 | 8 |
| Cup Holders | 20.75 | 2 |
You can also cut down the dowel to be 21.5″ long.

STEP 2: MAKE THE LEGS
For the (4) legs, first cut one side at a 25-degree angle with the long side measuring 13″.
Then, on the non-angled side, cut a 45-degree angle 1.25″ in on each side. If you choose, you can round out this side using a jigsaw, but the rough cuts from miter saw work just as well.
Next, mark 1.75″ from the top and each side. Using a 3/8″ drill bit, drill a hole in each of the legs at this point.

STEP 3: CUT OUT HANDLES AND CUP HOLDERS
First, we’ll cut out the handles. Grab 2 of your 48″ 1x4s and mark them 22.75″ from either side and 1.5″ in from what will be the bottom edge.
Line your 1.5″ paddle bit up with these marks and drill through the 1x4s. Place a scrap board underneath the 1x4s to help prevent the wood from tearing out when you drill through.

Then, cut out the gap between the holes using your jigsaw. These will be your handles.
Now for the cup holders. Grab both of your 20.75″ boards and mark 4″ and 7″ from each end. Then mark .25″ in from each side.
Connect the dots by drawing a circle. Tip: we used the center of a roll of painter’s tape. The diameter was 3″, so it worked perfectly to trace!
Drill a hole on one side of each of the circles using your 3/8″ drill bit. Then insert your jigsaw blade into the hole and cut out the circles.
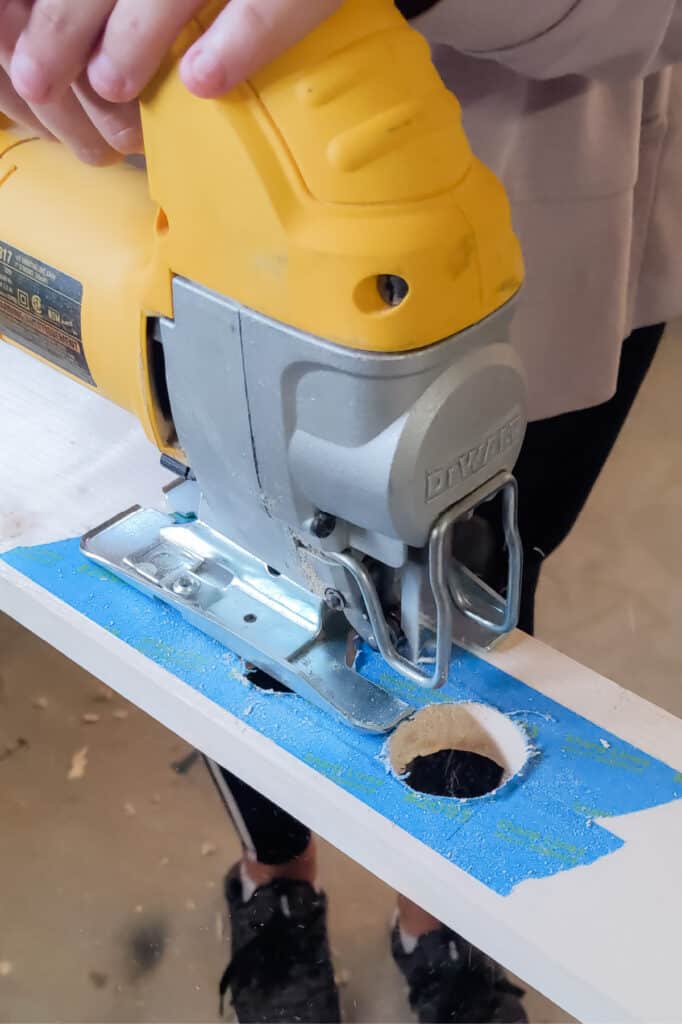
Finally, let’s go ahead and cut out the hole for the cornhole bags. We used this 6″ hole saw that’s perfect for cornhole boards, but you could also cut the hole out with a jigsaw.

The center of the hole should be 9″ from the top of the board and 12″ in from either side.
Note: you can also get pre-cut corn hole panels that already have the hole cut out in them.

STEP 4: DRILL POCKET HOLES
Using the 3/4″ setting, drill 2 pocket holes into each end of all of your 22.5″ boards. Also drill 2 pocket holes on either end of your cup holders.

Then switch to the 1/2″ setting and drill pocket holes that will be used to attach the plywood top to the base. We drilled (1) pocket hole into 4 of the 22.5″ boards and (2) pocket holes in the other 4 – 22.5″ boards (these will be the outside boards).
Finally, we drilled (4) pocket holes into the 48″ boards. Remember when you’re drilling pocket holes into the 48″ boards that the handles should be closer to the BOTTOM of the cornhole boards.
STEP 5: ASSEMBLE THE BASE
Using glue and 1.25″ screws, assemble your base. The outside 22.5″ boards should line up with the edge of the 48″ boards. The two middle boards should be placed 21″ and 27″ from one end.

STEP 6: SAND
Sand all of your boards with 120, 180, and 220 grit sandpaper for a smooth finish. Krylon Fusion All-In-One and Krylon COLORmaxx don’t require sanding before applying, but this will ensure your boards are nice and smooth to the touch. No one wants splinters!
STEP 7: STAIN
We wanted our stain to go 5″ from either side, so we placed a piece of tape at 5″.
Prior to staining, we applied a coat of Minwax Pre-Stain Wood Conditioner to the area to help get the most even coverage possible. Then we applied Special Walnut stain using a rag.
In addition to the section on the top of the cornhole boards, we also stained the dowel that will be used for scorekeeping.
STEP 8: SPRAY PAINT
This is where things get fun. When you start adding paint to your cornhole boards, there are infinite possibilities. You can do all sorts of designs or you can keep things simple by sticking with lines. We’re going for more of a classic look, so we opted for straight lines this go around.

We started by taping off the section for the middle. We placed a piece of tape 7 3/8″ from either side and then placed a piece of tape right on the edge of the stain lines and covered the stained sections with plastic.

We wanted to get it ready to quickly be able to transition from the 1st color to the second color. Once we got those sections taped off, we added some more tape in between the two pieces of tape to protect that section from the first color.
We started with Krylon COLORmaxx in Matte Aqua. COLORmaxx has over 100 on-trend colors to choose from, so you’ll definitely be able to find the perfect color for your project!

We applied a total of 3 coats and waited approximately 10 minutes between coats. We let it dry for one hour and then covered that area with paper and removed the excess tape to reveal the next stripe to paint.
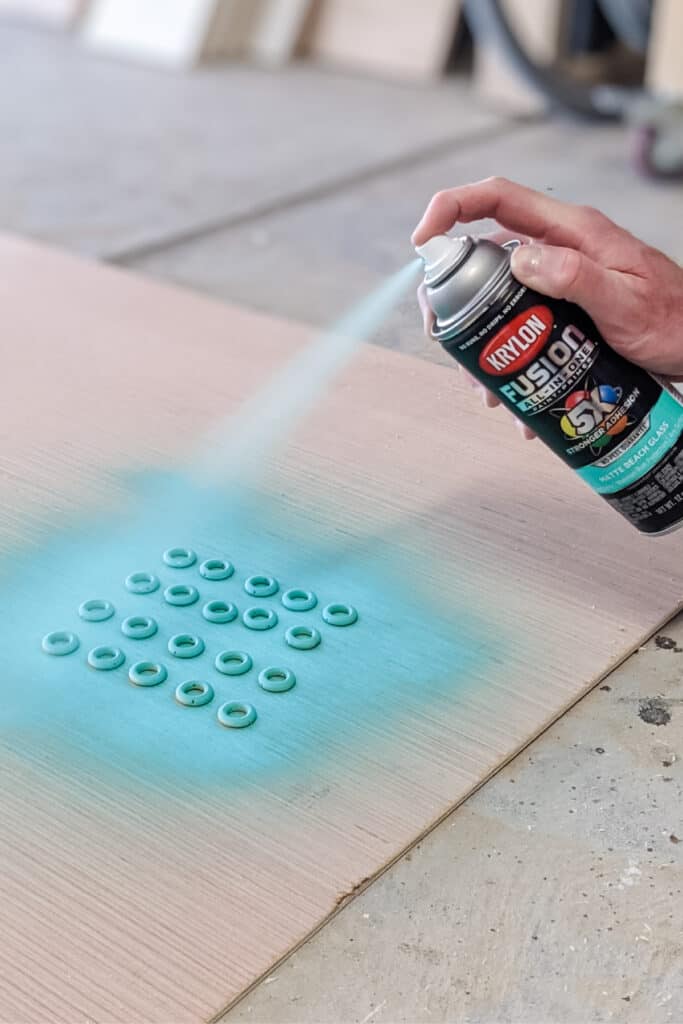
We also spray painted 21 wood beads to use for scoring.
Next up was Krylon Fusion All-In-One in Matte Ink Blue. This is one of our favorite Krylon colors. We used it on our DIY pegboard and it’s one of the 2021 Color Trends!

We also used this color for the legs and cup holders and to paint a stripe in the center of the scorekeeping dowel. We applied 2 coats on everything, waiting about 5 minutes between coats.
We let that dry for about an hour and then used delicate surface tape to mark off the two areas we already spray painted. Finally, we sprayed 2 coats of Krylon Fusion All-In-One in Matte Beach Glass , waiting 2 minutes between each coat. We also spray painted 21 wood beads for scoring.
In total, we used (2) cans of Krylon Fusion All-In-One in Matte Ink Blue, (2) cans of Krylon COLORmaxx in Matte Aqua, and only a fraction of a can of Krylon Fusion All-In-One in Matte Beach Glass.
STEP 9: SEAL
Both Krylon Fusion All-In-One and COLORmaxx are great for outdoor use and are extremely durable. Because of this, we usually don’t seal after using this spray paint, but we decided to seal the cornhole boards to help the bags slide a little bit. We like the added fun of being able to knock off other people’s bean bags by sliding across the top.
On matte surfaces, the bean bags won’t have much sliding power, which is why we opted to seal our boards with Minwax Pro-Series Spar Urethane in Semi-Gloss.
I’d recommend either semi-gloss or satin for cornhole boards. Matte doesn’t have enough sliding power and gloss gives it so much sliding ability that it’s hard to keep your bags on the board!
STEP 10: ATTACH THE TOP
Line the top up with the base and attach using 1″ screws through the pocket holes you drilled previously.

STEP 11: ATTACH LEGS
Before we attach the legs, we’re going to attach a cup holder to both sets and the scoring system to one set of the legs.
First we’ll drill holes for the scoring system. Mark 8″ up from the bottom of the longer end of your leg and then mark 1/2″ in. Drill halfway through the leg using a 3/8″ drill bit.

Make sure you don’t drill all the way through and repeat with the second leg.
Add a dab of glue in the hole and insert your dowel.
Next, we’ll line a thick piece of tape up with the angled side of the leg. This will be your guide on where to place the cup holder, so make sure it’s on the interior side of the leg.
Line your cup holder up with the top of the tape and attach with glue and screws.

Now we can install the legs. Mark 1/2″ from the inside corner of the base and line your legs up with that mark.
Clamp the leg in place and drill through hole you previously made in the leg and through the cornhole board base. You can clamp a board to the outside of the cornhole board base to help prevent tearout.

Remove the legs and insert the carriage bolts through the holes you just drilled. Then thread a washer, the leg, another washer, and screw in place with a wing nut.
STEP 12: ATTACH HINGES
Before we start attaching things, make sure you got the correct hinges–you should be able to separate them into two pieces. If your hinges don’t separate, neither will your cornhole boards!
Stack your cornhole boards on top of one another so that the handles are lined up. On the same side as the handles, measure 6″ from either end and attach your latches.
On the opposite side of the handles, measure 6″ from either end and attach your hinges.

There you have it! Now you know how to make your very own DIY cornhole boards that are complete with cup holders, bean bag storage, and a scoring system.
For more spray paint inspiration and project ideas, visit krylon.com.
Don’t forget to grab your printable plans!
Looking for more outdoor games? You won’t want to miss this tutorial for a DIY Connect 4 Yard Game!


")


Love this! Can’t wait to make my own. I am curious why I need 8 wing nuts and washers if I only need 4 carriage bolts?
Great catch Alyssa! We’ve updated the post — you only need 4 wing nuts. You’ll still want 8 washers (one to put on each side of each leg). Can’t wait to see how yours turn out!!
I’m starting the process, but what size wood rings do I get??
Hi Hilary! How exciting! You can use any wood rings that will slide on a 3/8″ dowel.
Are these directions avaiable in an easily printable format?
Hi Ron! We don’t currently have printable plans for this project, but it’s on our to-do list!
What are the size of the legs. You are missing 4 pcs
The details of the legs (angles and sizing) are in step 2.