


Price
Time
Difficulty
This post was sponsored by Krylon. All opinions are my own. This post also contains affiliate links for your convenience (which means if you make a purchase after clicking a link, I may earn a small commission, but it won’t cost you a penny more)! Click here to read our full disclosure.

When I set out to update these vases, I had grand plans to try out all sorts of different techniques using a variety of different materials and textures.

But then I painted the first one…
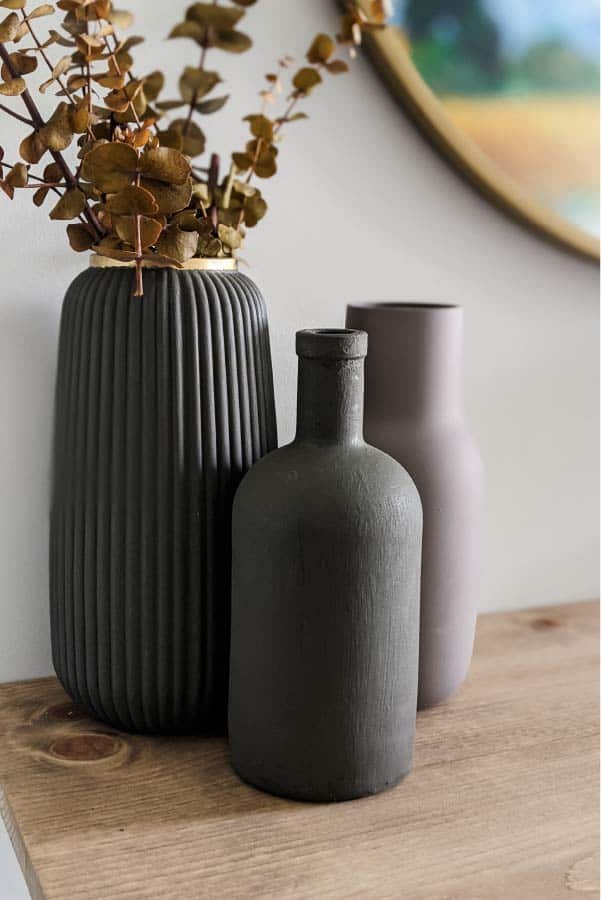
The finish was a perfect combination of soft and modern. The color was warm and neutral and I was hooked. My boring glass vase was instantly transformed into a modern ceramic-looking vase.

I still ended up trying 4 different techniques that I’ll share with you today, but in the end, I couldn’t get enough of the simplicity of the chalky finish. It left each vase feeling artisanal, modern, and as if they were all part of the same collection, despite the wide variety of shapes and sizes.
To finish all of the vases in our new “collection”, here are the spray paints we used:

Alright, let’s start DIYing!
New to DIY? Download our free 5 Steps to Getting Start with DIY guide!
4 ways to paint a vase
What You’ll Need
- Vases or jars (I grabbed some from Good Will and the rest from Michael’s and Hobby Lobby)
- Clean rags or paper towels
- Delicate surface painter’s tape
- Krylon Chalky Finish in Classic White
- Krylon Chalky Finish in Paver Gray
- Krylon Chalky Finish in Mink
- Krylon Fine Stone Textured Finish in Limestone
- Paint (we used a sample of the 2021 Color of the Year: Sherwin William’s Urbane Bronze)
- Baking soda
- Purdy XL brush
TECHNIQUE #1: SIMPLE CHALKY FINISH
Let’s start with the simplest transformation: chalky finish spray paint. Don’t be fooled by “simplest” — just because it’s easy to do, doesn’t mean it doesn’t make a big impact.

Start by cleaning your jar or vases (or in my case: pitcher). I just wiped mine down with a damp paper towel and then dried it off to prep.
Then grab your spray paint (I told you it was simple).
One of the great things about Krylon Chalky Finish Paint is that there is no primer or prep needed. As long as your starting surface is clean, you’re ready to go!
Shake up your spray paint and lightly spray your vase, working in lines. As you spray each new line, slightly overlap the area you’ve already painted.
After getting the first coat on, I waited about a minute, re-shook my can and started the next coat.
The number of coats you’ll need will probably depend on your color. I did three coats of white for full coverage, but only needed two for both Mink and Paver Gray.
Overall, each of my vases only took about 3 minutes to transform with Krylon Chalky Finish Paint! And despite having a lot of vases, I only went through one can of each color.

If you want to seal your vases without losing the ultra-matte look, I’d recommend Krylon Matte Sealer Chalky Finish. It’s a clear sealer that was designed specifically to keep the look of the Krylon Chalky Finish Paint which is SO good.
Note: my pitcher is purely decorative and used to hold faux flowers, not drinks for human consumption.

TECHNIQUE #2: LIMESTONE FINISH
Technique number 2 is also very simple to achieve. Once your surface is clean, you can start spraying.

Compared to non-textured spray paint, this stuff comes out with some force. Because of that, it’s extra important to keep a few things in mind:
- Shake your can for at least 1-2 minutes before spraying.
- Keep your distance! When spraying, stay at least 10″ away from the vase your spraying.
- Light, fast coats. Don’t say in one place too long. Keep it moving to avoid uneven spots.

These are rules you should follow for all spray paint, but they’re especially important if you want a consistent texture finish.
For my stone vases, I applied three coats to get really even, solid coverage throughout the whole vase.

Overall, I was really impressed by the Krylon Fine Stone Textured Finish. It ended up looking exactly like the top of the can. It has a fine texture and I loved the color variation. There were little specks of black and white and tan that made it look like genuine limestone.
If you want your vases to have a consistent color and a stony texture, you can wait 15 minutes for the stone finish to dry and then coat your vase with a solid color.

And if you prefer even more texture than what’s available in the Fine Stone Textured Finish spray, you’re in luck. Krylon also offers a Coarse Stone Textured Finish. It’s so fun to apply. It looks almost like foam when you first spray it.
For more spray paint inspiration and project ideas, visit krylon.com.
TECHNIQUE #3: TWO-TONE

To get this look, you’ll start by making sure your vase is nice and clean.
Once it is, spray three coats of Krylon Chalky Finish Paint in Classic White.
Wait two hours to make sure that the paint is fully dry. Technically, you should only need to wait an hour, but I always like to give my paint extra time when I’m going to be putting tape on it.
Once your vase is dry, add some delicate surface tape to mark off the area you want to paint vs. the area you don’t want to paint.
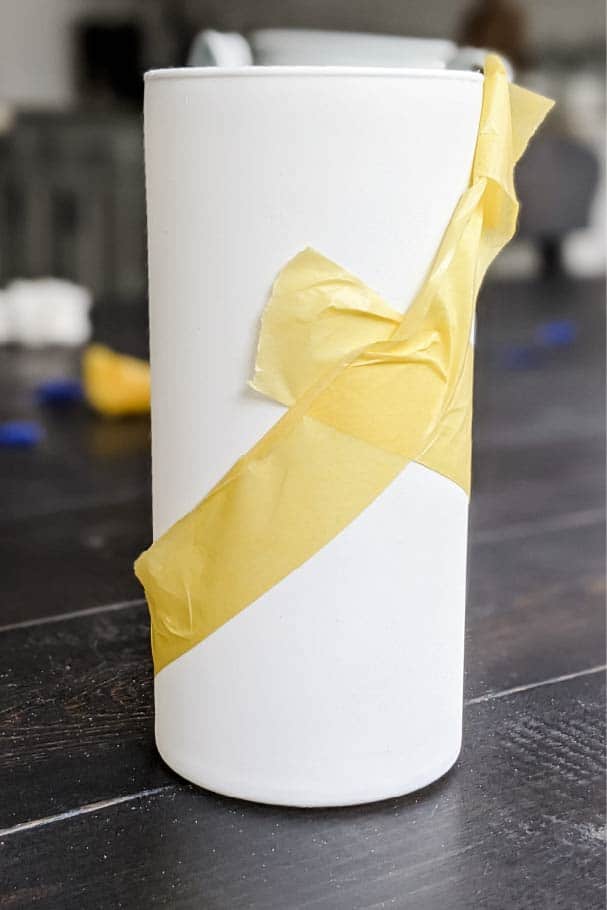
I decided to have my tape come to two points, but you could also tape yours so that its straight across as one continuous slant. You could also tape diamonds or other patterns onto your vase–the options are endless!
Once everything is taped, tape a paper towel over the section that you aren’t about to paint. This will prevent overspray from discoloring the section.
Then, spray your second color. Instead of going for a solid color, I decided that the bottom portion of my vases would be stone textured.

I used my Krylon Stone Fine Textured Finish in Limestone to accomplish this look, applying two coats.
After letting the textured spray paint dry for 15 minutes, I removed the tape to reveal nice, clean lines.

Including dry-time, our two-tone vases took 2.5 hours from start to finish.
TECHNIQUE #4: PAINT + BAKING SODA
I decided to add in this technique for a single purpose: to give myself an excuse to try to Sherwin Williams 2021 Color of the Year. Lucky for me, it fit in perfectly with the colors I used for the rest of my vases.
For this one, grab any sort of paint and some baking soda. I just used a paint sample from Sherwin Williams.

Mix together some baking soda and paint. I added about 3-4 spoonfuls of baking soda to my little bowl of paint.
If you want a less textured finish, spend extra time mixing up the paint and baking soda combo and don’t add too much baking soda. Regardless of how well you mixed it, the baking soda is still going to leave a little bit of texture behind.
Once you’ve mixed it together, grab your Purdy XL brush and start painting!

Since the paint will dry with some texture, think about your brush strokes. Do you want them all the same direction? Do you want it to feel more random or do you want continuous brush strokes that make it all the way around the vase?
There’s no right or wrong answer here. You get to decide on the look you want.
Let the paint dry for about 30 minutes between coats. I ended up adding two coats, but I think I’ll need to go back and do a third. The sun still shines through my vases in a few spots.
Tip: If you’re not painting multiple items and don’t want your paint to dry out in between coats, wrap it in saran wrap and put it in the fridge when you’re not using it.
OTHER TECHNIQUES TO TRY
I covered 4 techniques you can use to transform any vase or jar, but that’s just the tip of the iceberg.
Here are 3 more quick ideas for you to consider:
- Stencils. Spray paint and stencils are a match made in heaven. Simply spray over your stencil and reveal crisp lines and a fun pattern. If you don’t have a stencil lying around, this same technique works with lace!
- Mud. Mud? Yup, you heard me right. You can actually use mud to give your vases an aged look with some texture.
- Texture stickers. Grab some small stick-on pearls or textured decals from Michael’s and add them to your vase. Add them randomly, in stripes, or all over. Once they’re positioned, spray paint it to give it a cohesive look.
Oh, and one more thing…with Krylon Chalky Finish spray, you can leave it as is OR you can sand off some of the chalky finish. It’s an especially great technique to try when you have a textured vase. When you sand a little bit off, it gives the vase a distressed look.

The moral of the story is this: if you see an ugly vase on clearance, BUY IT.
There are limitless ways to transform any vase into a piece of decor that you love without breaking your budget. You can make a huge difference even with one simple can of spray paint!
For more spray paint inspiration and project ideas, visit krylon.com.


")


I’m so surprised and happy this appeared in my Pinterest feed today! Thank you, just what I have been looking for!
Beautiful!! I am starting my own Homestaging business and this will come in handy for accessories and very cost effective. Thank you!!
This is perfect for that! Best of luck with the home staging business–how exciting! 🙂
What’s the green color you used from Sherwin William ?
We used the 2021 Color of the Year: Urbane Bronze
Did you coat the inside of the pitcher as well?
Hi Alina! We coated the inside just as far as you can see in it. We didn’t worry about getting it 100% covered–just enough for when you look into it. I think it’s important to note that we do not use the pitcher for anything other than faux flowers. If you’re planning to put any liquid in it, I would not recommend spray painting the inside. Hope that helps!
These look awesome, great jo!
Thank you! There are so many possibilities!
I have been looking for ways to repaint old lamps and glass vases. Does the spray paint adhere well to the glass, or does it chip/peel easily? I love this look, thanks for the inspiration!
Hi Amie! The chalk paint adheres great. We haven’t had any chips or scratches on those. The baking soda+paint doesn’t adhere as well though. I’d recommend priming first if you wanted to use that option!
GREAT IDEAS AND TECHNIQUES! Thanks for making it easy to understand what it is you did!! Sometimes full disclosure isn’t always easy to describe, but you did an awesome job!